
Grandmas Old Fashioned Suet Pudding Recipe — Classic Comfort Dessert
I grew up with a simple suet pudding that showed me how a few basic ingredients can make a warm, satisfying dessert. The pudding has a dense, moist texture and a mild sweetness that pairs well with custard or cream, making it a reliable choice for family nights and holiday meals.
I will guide you through a clear, easy version of this old-fashioned recipe so you can recreate that comforting taste at home. The steps and tips I share focus on straightforward preparation and dependable results, whether you are trying suet pudding for the first time or returning to a familiar favorite.
Key Takeaways
- The recipe uses a few simple pantry ingredients for a hearty dessert.
- Clear steps and basic tools make the pudding easy to prepare.
- The pudding stores well and serves nicely with creamy sauces.
Ingredients
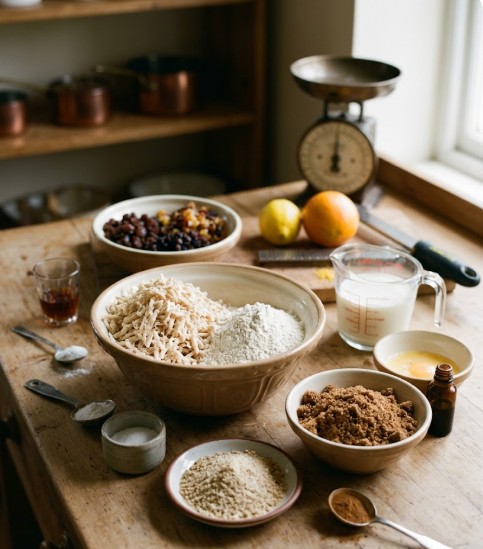
Dry Mix
- Beef suet, shredded — 8 oz (225 g). I use suet for the pudding’s traditional texture.
- All-purpose flour — 8 oz (225 g), sifted to keep the mix light.
- Breadcrumbs — 4 oz (115 g), finely ground; stale or fresh both work.
- Dark brown sugar — 6 oz (170 g) for a deep, molasses-like sweetness.
- Baking powder — 1 tsp to give a bit of lift.
- Salt — 1/2 tsp to balance the sweetness.
- Ground cinnamon — 1/2 tsp (optional) to add warm spice.
Wet Mix
- Whole milk — 6 fl oz (180 ml), at room temperature so it blends easily.
- Large egg — 1, lightly beaten to bind the batter.
- Vanilla extract — 1 tsp (optional) to boost flavor.
Extras You Can Add
- Dried fruit — 4 oz (115 g) of raisins, currants, or chopped mixed peel for fruitiness.
- Brandy or dark rum — 2 tbsp to deepen the flavor (optional).
- Citrus zest — 1 tsp of lemon or orange zest, freshly grated for brightness.
Quick notes:
- I measure suet and flour by weight for consistent results.
- If I can’t find suet, I sometimes substitute frozen grated butter, but the texture changes slightly.
- I keep add-ins optional so the pudding can be plain, boozy, or fruity depending on the occasion.
Equipment Needed
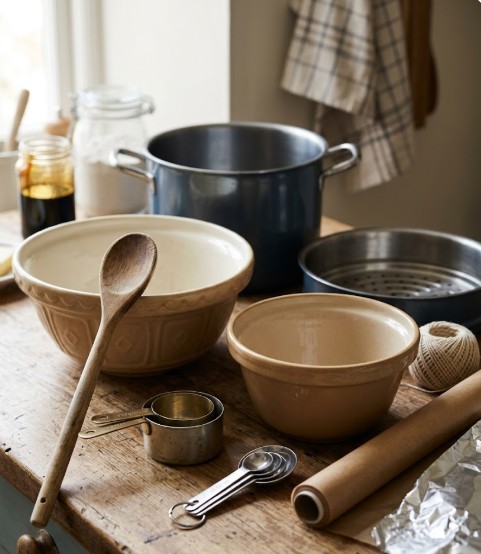
Tools at a Glance
I gather a few simple tools that make the suet pudding come out right every time.
- Large mixing bowl — I use this to mix dry and wet ingredients without mess. A roomy bowl gives space to fold in suet and fruit.
- Measuring cups and spoons — I measure flour, suet, molasses, and spices precisely so the texture stays consistent.
- Sturdy spoon or spatula — I prefer a wooden spoon or a strong spatula to combine the mixture without overworking it.
- Pudding basin or heatproof bowl — I shape the pudding in a basin about 1 to 1.5 quarts. A deep heatproof bowl with a lid works if I don’t have a traditional basin.
- Large pot and steaming rack (or steamer) — I steam the pudding gently. The pot needs a tight-fitting lid and a rack to keep the basin off the bottom.
- Greaseproof paper and aluminum foil — I cover the basin with two sheets of greaseproof paper and wrap them in foil to trap steam.
- Kitchen twine — I tie the paper and foil securely so no steam escapes during steaming.
I keep everything within reach before I start. That way I can move smoothly from mixing to steaming without interruptions.
Below is a compact reference table I use while prepping.
| Item | Purpose | Quick note |
|---|---|---|
| Mixing bowl | Combine ingredients | Choose a large size |
| Measuring cups & spoons | Accurate measurement | Use standard sets |
| Spoon or spatula | Mix and fold | Sturdy for suet |
| Pudding basin / heatproof bowl | Shape and hold pudding | ~1–1.5 qt capacity |
| Steaming rack & large pot (or steamer) | Steam pudding | Pot must have tight lid |
| Greaseproof paper | Seal basin lid | Use two layers |
| Aluminum foil | Outer seal | Wrap tightly over paper |
| Kitchen twine | Secure wrapping | Prevents steam loss |
I arrange these tools on the counter before I start to keep the process steady and stress-free.
Prep Work

Getting the Suet Ready
I start by choosing fresh beef suet or pre-shredded suet from the store. If I have a large block, I grate or pulse it in a food processor until it looks crumbly. I keep the suet chilled while I work so it stays firm; warm suet can smear and change the pudding’s texture. I do not swap in butter or vegetable shortening—suet melts and sets in a way those fats do not, and that difference matters for the final crumb.
I also trim any sinew or tough bits before shredding. If the suet softens too much, I return it to the fridge for 15–20 minutes. Small, cold pieces mix more evenly through the batter and give a consistent richness.
Combining Dry and Wet Ingredients
I use two bowls: one for dry items and one for liquids. In the dry bowl I whisk together all-purpose flour, breadcrumbs (if using), brown sugar, baking powder, salt, and any spices like cinnamon or nutmeg. I mix the shredded suet into the dry mix so the fat is evenly dispersed before liquids arrive.
In the wet bowl I beat milk with an egg and vanilla; I sometimes stir in a splash of brandy or a little citrus zest for extra aroma. I pour the wet mix into the dry ingredients slowly while stirring with a sturdy spoon. I stop as soon as the mixture comes together — overmixing can make the pudding tough.
Finally, I fold in dried fruit like raisins, currants, or chopped dates. I do this gently so the fruit stays whole and spreads evenly. The batter should be thick and slightly sticky; if it seems too dry I add a tablespoon or two of milk, and if it’s too loose I sprinkle in a bit more flour. This balance helps the pudding steam up moist but still hold its shape.
Cooking Instructions
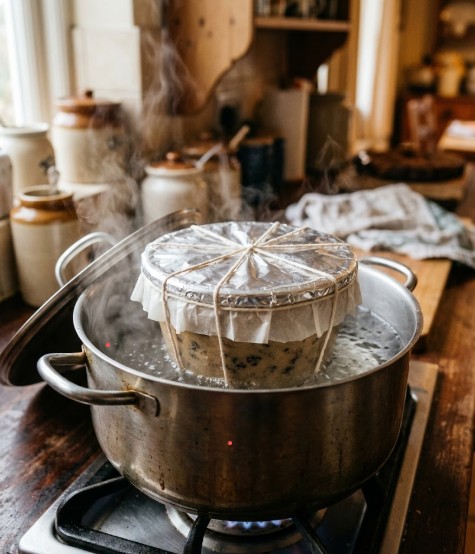
Steaming the Pudding (Traditional Steam Method)
I grease a pudding basin well with butter or line it with greaseproof paper. I spoon the suet pudding mixture into the basin and press down gently to remove any big air pockets, leaving about 1 inch (2.5 cm) of space at the top for expansion.
I cover the basin with two layers of greaseproof paper, then a layer of foil. I secure this with kitchen twine and make a small pleat over the center so steam can move around the pudding.
I set the basin in a large pot or steamer with boiling water that comes halfway up the basin sides. I keep the pot covered and steam gently for 2 to 3 hours. I check the water every 30–45 minutes and add more boiling water if it drops too low.
When the time is up, I remove the basin carefully, unwrap it, and let the pudding rest for 10–15 minutes before turning it out. This short cool period helps the pudding hold its shape while still keeping it warm for serving.
Quick checklist
- Basin prep: butter or greaseproof paper
- Fill: leave 1 inch (2.5 cm) headspace
- Cover: 2 layers paper + foil, tie with twine, pleat for steam
- Water: halfway up basin sides; top up as needed
- Time: 2–3 hours on a gentle steam
- Rest: 10–15 minutes before unmolding
Other Cooking Options (Oven & Slow Cooker)
Oven water-bath method:
- Preheat oven to 325°F (160°C).
- Place the covered basin in a deep roasting pan.
- Pour hot water into the pan until it reaches halfway up the basin.
- Bake 2.5 to 3 hours, checking the water level once and adding more hot water if needed.
- Let the pudding sit 10–15 minutes before turning it out.
Slow cooker method:
- Grease and fill the basin as for steaming.
- Wrap the basin in a clean kitchen towel to help insulate and catch condensation.
- Put the basin in the slow cooker and add hot water to come halfway up the sides.
- Cook on low for 4 to 5 hours, topping up water if it lowers too much.
- Rest 10–15 minutes before unmolding.
Comparison table
| Method | Temperature/Setting | Time | Water level |
|---|---|---|---|
| Steaming | Gentle simmer/steam | 2–3 hours | Halfway up basin |
| Oven (water bath) | 325°F (160°C) | 2.5–3 hours | Halfway up basin |
| Slow cooker | Low setting | 4–5 hours | Halfway up basin |
Notes and tips
- Keep the cooking gentle and slow to avoid a dry texture.
- Always maintain water at halfway up the basin sides so the pudding cooks evenly.
- Use boiling water for top-ups to keep the temperature steady.
- Allow brief cooling before unmolding to prevent breaking the pudding.
Serving Suggestions
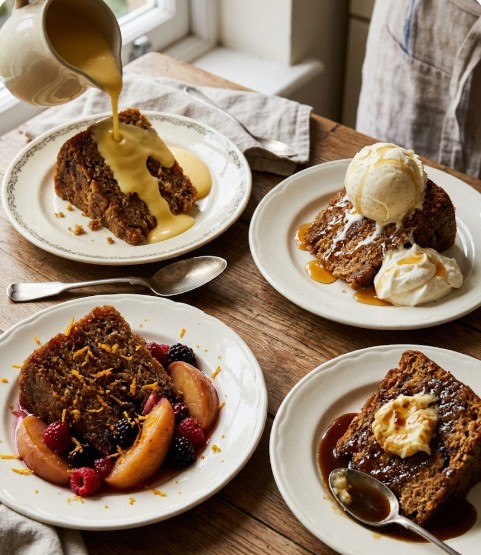
Classic Pairings I Recommend
I serve the pudding warm to keep its dense, moist texture. Hot custard makes the most traditional match; I pour it over each slice so the sauce soaks into the crumbs. Thick slices hold up best to generous ladling.
Creamy Toppings and Syrups I Use
For a lighter finish, I add a spoonful of whipped cream or a scoop of vanilla ice cream. I also drizzle golden syrup or treacle for deeper sweetness. A little vanilla in the cream lifts the flavor without adding fuss.
Fruit and Citrus Add-Ons I Like
I pair the pudding with steamed or poached fruit — apples, pears, or mixed berries work well. I finish with a light grating of lemon or orange zest to add a fresh, bright note that cuts through the richness.
Festive and Warm Serving Ideas I Choose
At holidays, I warm the pudding and top it with brandy butter or a spiced rum sauce for a celebratory touch. These boozy sauces add warmth and scent, and a small splash is enough to make the dish feel special.
Temperature and Portion Guidance I Follow
I always serve suet pudding warm and cut it into substantial slices so each portion stays moist. Follow this quick table for easy choices:
| Serving Option | What it Adds | How I use it |
|---|---|---|
| Hot custard | Creaminess | Pour generously over warm slices |
| Whipped cream / ice cream | Lightness | Add just before serving |
| Golden syrup / treacle | Sweet, caramel notes | Drizzle thinly |
| Poached fruit | Freshness and texture | Serve on the side or atop |
| Brandy butter / rum sauce | Festive warmth | Spoon sparingly for balance |
I keep portions moderate and plate combos simple so the pudding’s flavor stays the focus.
Storage and Leftover Tips
Keeping a Just-Cooked Suet Pudding Fresh
I let the pudding cool fully on the counter first to avoid trapped steam.
After it reaches room temperature, I wrap it tightly in plastic wrap or put it into an airtight container.
I keep it in the refrigerator and use it within 3–4 days for best texture and taste.
Freezing to Keep Pudding Longer
I freeze only fully cooled pudding to prevent sogginess.
I wrap it in greaseproof paper, then in foil, and place it in a freezer-safe bag or container.
I label the package with the date and store it up to 3 months.
Tip: double-wrapping helps stop freezer burn and keeps flavors stable.
Heating Up Leftover Pudding
I prefer steaming to warm leftovers because it restores moisture.
Method: place the pudding basin over simmering water and steam 30–40 minutes, or until heated through.
Oven option: rewrap and warm at 350°F (175°C) for about 30 minutes.
I avoid microwaving; it dries the pudding and changes the dense texture.
Ways I Re-Serve Leftovers
- Spoon warm custard or thick cream over slices to revive richness.
- Add a scoop of vanilla ice cream for contrast between hot and cold.
- Drizzle brandy butter, golden syrup, or a warm vanilla sauce for extra flavor.
- For quick serving, lightly warm individual slices in a skillet with a knob of butter.
Storage quick reference (my routine):
- Refrigerator: fully cooled, airtight — use in 3–4 days.
- Freezer: fully cooled, greaseproof paper + foil + bag — up to 3 months.
I find gentle reheating and simple accompaniments keep the pudding moist and flavorful.
Conclusion
I treasure the way this suet pudding links me to family and simpler times. I follow the classic steps and real ingredients to get that dense, moist texture I remember. I like serving it warm with custard, cream, or a spiced sauce to bring out its flavor.
- I use tried methods to keep the pudding authentic.
- I share it at gatherings to create new memories.
I plan to keep making this recipe so its taste and comfort stay part of my family’s traditions.
Frequently Asked Questions
What exactly is Grandma’s old suet pudding?
I describe it as a traditional British steamed dessert made with shredded beef suet mixed into a flour-based batter. It turns out dense and moist, mildly sweet, and is usually served warm with custard, cream, or syrup.
Which ingredients do I need to make it?
I use shredded beef suet, all-purpose flour, and a sweetener like dark brown sugar. I often add breadcrumbs, baking powder, a pinch of salt, and optional items such as milk, an egg, vanilla, dried currants or raisins, and citrus zest or a splash of brandy.
What tools will I need?
I recommend a large mixing bowl, measuring cups and spoons, and a sturdy spoon or spatula. You’ll also want a pudding basin (or a heatproof bowl), greaseproof paper and foil, kitchen twine, and a steaming setup or large pot with a rack.
How should I handle and ready the suet?
I shred the suet finely and chill it before mixing. Cold, finely shredded suet blends better into the batter and helps give the pudding its rich, moist texture.
Which cooking method works best?
I prefer steaming for the classic moist finish and texture. You can also bake it slowly in the oven or cook it in a slow cooker, but keep the heat low and cooking time long so it stays tender.
How do I present and serve the pudding?
I serve it hot, topped with warm custard, whipped cream, golden syrup, or a boozy butter sauce. Poached fruit, extra citrus zest, or a scoop of ice cream work well too.
What’s the best way to store leftovers?
I let the pudding cool fully, wrap it tightly, and refrigerate for 3–4 days. For longer storage, I freeze it up to 3 months. Reheat by steaming to keep it moist.
Can I change the flavor to suit my taste?
Yes. I often tweak the recipe with dried fruits, nuts, spices, brandy, or citrus zest. Small changes keep the pudding’s traditional texture while adding new flavors.
FAQs
Q1: What makes my grandmother’s suet pudding different from other steamed puddings?
I use suet fat as the main fat, which gives the pudding a firmer, dense texture and a rich, slightly savory flavor. I also add dried fruit and warm spices, then steam the batter for hours to develop deep taste and moistness that you don’t get from baked puddings.
Q2: Is suet pudding safe to eat and how should I store it?
Yes, suet pudding is safe when cooked fully (internal temperature should be hot throughout). After cooling, I wrap leftovers tightly and keep them in the fridge for up to 4 days. For longer storage, I freeze portions for up to 3 months and thaw in the fridge before reheating.
Q3: How do I keep the pudding moist during steaming and reheating?
I seal the pudding basin well with foil or a lid to trap steam. While reheating, I use low heat and add a little extra sauce or a splash of milk to prevent drying. Steaming gently keeps the texture soft and prevents overcooking.
Q4: Can I substitute suet with vegetable fat or butter?
Yes, I can swap suet for shredded vegetable suet or chilled grated butter, but the texture will change. Vegetable suet mimics the traditional mouthfeel better than butter. If I use butter, I expect a softer, less distinct suet structure.
Q5: How does suet pudding compare to other holiday desserts in nutrition and flavor?
Suet pudding is richer and higher in fat than many lighter desserts. I find it more filling and hearty, with a dense crumb and strong spice notes. It pairs well with custard or hard sauce to balance its intensity.
Q6: Are there safety concerns when steaming for several hours?
I monitor the water level in the steamer or pot to prevent it from boiling dry. I check periodically and top up with hot water as needed. Using a stable heat source and a tight cover reduces the risk of accidents.
Q7: How do I maintain consistent results each time I make it?
I measure ingredients precisely, use room-temperature eggs and liquids, and keep steaming time and temperature steady. I also let the pudding rest briefly after cooking before unmolding; this helps it set and hold shape when served.
Conclusion
I recommend Grandma’s old fashioned suet pudding as a reliable, comforting dessert that stands up well to modern kitchens. I find it effective at feeding a crowd, staying moist when steamed, and pairing nicely with custard, vanilla sauce, or a simple drizzle of syrup.
I note that the recipe uses simple pantry ingredients and traditional suet, which gives the pudding a rich texture. If you prefer, you can swap beef suet for vegetarian suet or grated cold butter for a similar result. These swaps keep the dish safe and practical for different diets.
I value recipes that are both low-waste and low-cost. This pudding fits that goal because it uses basic flour, dried fruit, and spices you likely already have. Steaming for a few hours uses no special equipment beyond a pot and a mold, making it eco-friendly compared with energy-heavy baking.
I advise choosing quality, fresh ingredients and a trusted recipe source for consistent results. Follow safe steaming and storage practices: cool fully, refrigerate leftovers, and reheat gently.
I encourage you to try the recipe, adapt it to your tastes, and keep it in your rotation for holidays or simple family meals. I expect it will become a dependable, much-loved dish in your kitchen.