
Satsuma Marmalade Recipe — Simple, Zesty Preserve for Beginners
I love how satsumas pack bright, sweet-tart flavor into small, easy-to-peel fruits. I’ll show how those delicate zests and juicy segments turn into a simple, homemade marmalade that keeps a fresh citrus taste on hand year-round.
This recipe stays straightforward and rewarding, so I can guide both new and experienced cooks through making a vibrant spread. With only a few ingredients and some patience, I’ll help you make a marmalade that works on toast, in desserts, or as a glaze.
Key Takeaways
- I explain what satsuma marmalade is and why it tastes special.
- I list the simple ingredients and steps needed to make a reliable batch.
- I cover how to set, store, and use the marmalade once it’s ready.
Ingredients
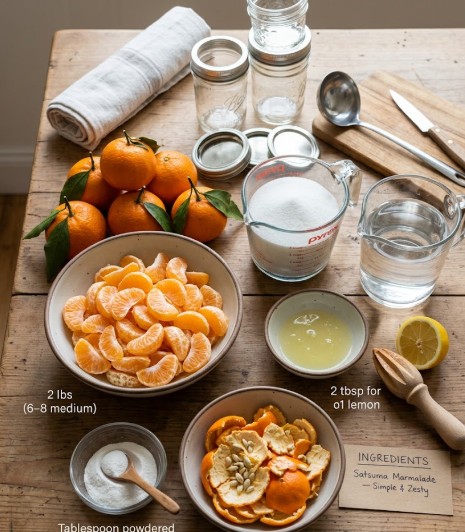
I use a short list of simple items to make bright, well-set satsuma marmalade. Each one affects flavor, texture, or shelf life, so I measure carefully.
- Satsumas — 2 lb (6–8 medium)
Peeled and separated into segments. I remove all seeds and inner membranes for a smooth spread. - Granulated sugar — 3 cups
I measure this precisely; it sweetens and helps preserve the marmalade. - Water — 3 cups
I prefer filtered water. It helps extract juice and soften peels during cooking. - Fresh lemon juice — 2 tbsp
I squeeze fresh lemons to add acidity and help the natural pectin set. - Pectin (optional) — 1 tbsp powdered
I add this only if I want a firmer set than the satsumas give on their own.
Bold the amounts when prepping. I keep a small bowl for discarded seeds and membranes, and a clean towel for drying jars and utensils.
Equipment Needed
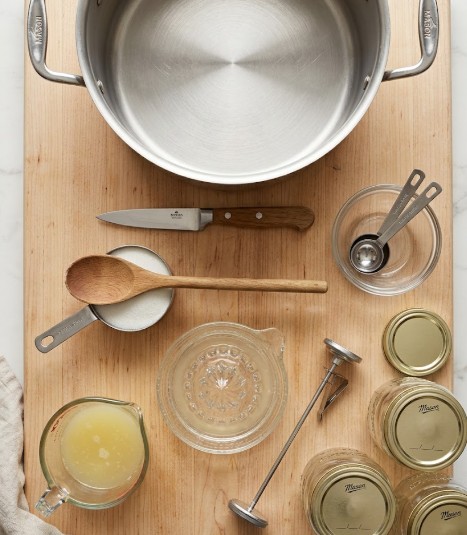
Key tools I use for satsuma marmalade
- Large heavy-bottomed pot — I simmer fruit and sugar here so heat spreads evenly and the jam won’t scorch.
- Sharp paring knife — I peel and trim the satsumas with control and minimal waste.
- Cutting board — I keep a steady surface for slicing and segmenting fruit.
- Citrus juicer or reamer — I press fresh lemon juice quickly and get more juice than by hand alone.
- Measuring cups and spoons — I measure sugar, water, and lemon precisely for consistent results.
- Wooden spoon or heatproof spatula — I stir gently to prevent sticking and to distribute pith and peel evenly.
- Candy thermometer — I check the temperature to know when the marmalade reaches the setting point (about 220°F / 104°C).
- Sterilized glass jars with lids — I pack and store the hot marmalade safely for short-term use or water-bath canning.
Other items that make the process easier
- Fine mesh strainer (optional) — I use this to remove seeds or large pith pieces when I want a smoother spread.
- Large bowl with ice water — I drop a spoonful into the bowl to test how well the marmalade sets after cooling.
- Jar funnel — I transfer hot marmalade into jars without spills.
- Tongs and potholders — I handle hot jars and lids safely.
I gather these tools before I start so the cooking and preserving steps flow smoothly.
Preparing the Satsumas
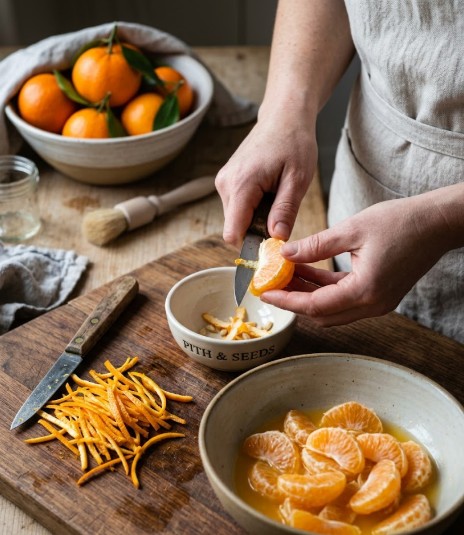
Cleaning and Taking Off the Peel
I wash each satsuma under cold running water to remove dirt and any wax. I use a soft brush and then pat the fruit dry with a clean towel.
With a sharp paring knife, I cut thin strips of the colored zest, taking care not to cut into the bitter white pith. I save those zest strips; they add bright flavor and aroma to the marmalade. After zesting, I peel the satsumas fully so I can work with the juicy segments.
Getting Rid of Seeds and Bitter Pith
I separate the satsuma into segments over a bowl to catch the juice. I check each segment and remove any seeds with the tip of my knife or with tweezers.
I trim away thick white pith from the segments to prevent bitterness, but I leave a little thin pith when needed for natural pectin. I collect the juice, peeled flesh, and zest separately so they’re ready for the cooking step.
Key steps at a glance:
- Wash fruit with a soft brush and dry.
- Cut thin zest strips; avoid the white pith.
- Peel the fruit completely.
- Separate segments and catch the juice.
- Remove seeds and trim excess pith; keep thin pith for pectin.
This prep keeps the marmalade bright, reduces harsh bitterness, and preserves the natural pectin for a good set.
Making the Marmalade
Mixing the Elements
I start by measuring and adding the fruit and liquids to a large, heavy pot. I use about 2 pounds of peeled, segmented satsumas, then pour in 3 cups of water. I stir in 3 cups of granulated sugar and add 2 tablespoons of fresh lemon juice for balance. If I want a firmer set, I may add 1 tablespoon of pectin.
- Purpose of each item:
- Satsumas: main flavor and texture
- Water: cooking medium
- Sugar: sweetness and preservation
- Lemon juice: brightens and balances
- Pectin (optional): helps firm the set
I gently stir until the sugar dissolves. This prevents gritty spots and helps the flavors blend evenly before the heat goes on.
Heat and Finish
I set the pot over medium heat and bring the mixture to a steady, gentle boil. I stir often with a wooden spoon to keep fruit and peel from sticking or burning on the bottom.
- Cook time and checks:
- Simmer and boil for about 25–30 minutes, watching for thickening.
- Use a chilled plate test: drop a small spoonful on a cold plate, chill briefly, then push it. If it wrinkles, it’s set.
- Or use a candy thermometer: aim for near 220°F (104°C), the usual jelly point.
If I added pectin, I follow the packet directions for timing—often adding it midway or in the last few minutes. When the marmalade reaches the right thickness, I remove the pot from heat and let it rest for about 5 minutes so bubbles settle.
Notes on texture and color:
- The peel turns more translucent.
- The mixture takes on a glossy, amber look.
- The aroma shifts from sharp citrus to a balanced sweet-tart scent with light caramel notes.
Quick checklist before bottling:
- Set test passed (plate or thermometer)
- Sugar fully dissolved earlier
- No scorching on the pot bottom
- Rested briefly off heat
I then proceed with whatever preserving method I plan to use, confident the marmalade has reached the proper texture and flavor.
Setting and Storing the Marmalade
Checking the Gel (Testing for Set)
I use three simple checks to know when the marmalade has reached the right thickness.
- Spoon test: Dip a cold metal spoon into the hot marmalade and lift it out. If the marmalade falls in thick, slow drops, it is close to set.
- Plate test: Put a small spoonful on a chilled plate. Wait 1–2 minutes, then push it gently. If the surface wrinkles and resists, the set is good.
- Temperature test (optional): A candy thermometer should read about 220°F (104°C) at sea level for a reliable set. Remember that higher altitudes lower the boiling point, so adjust expectations.
If the marmalade fails these checks, I return it to the heat and cook for a few more minutes, repeating the tests until it meets the criteria.
Cleaning Jars and Filling Them (Jar Sterilization and Filling)
Sterile jars keep marmalade safe and preserve flavor. I follow a clear two-part routine: prepare jars and then fill them.
Sterilizing jars
- Wash jars, lids, and bands in hot, soapy water. Rinse thoroughly to remove all soap.
- Place jars upside up on a baking tray and warm them in a 275°F (135°C) oven for 10–15 minutes.
- Boil lids and bands in water for 5 minutes to sterilize them.
- Use clean tongs or a jar lifter to avoid touching the sterilized surfaces.
Filling and sealing
- Remove jars from heat carefully. Ladle very hot marmalade into each jar, leaving about 1/4 inch (6 mm) of headspace to allow for expansion.
- Wipe the jar rims with a damp, clean cloth to remove any sticky residue.
- Center the lids and screw bands on until fingertip-tight. Do not over-tighten.
- Optional quick-seal step: invert jars for 5 minutes to help the seal form, then return them upright to cool.
Storage and checks
- After jars cool, press the center of each lid. A proper seal will not flex up and down.
- Label each jar with the date and contents.
- Store sealed jars in a cool, dark, dry place. Properly canned marmalade keeps up to one year.
- Refrigerate jars after opening and use within a few weeks.
Quick reference (at-a-glance)
- Headspace: 1/4 inch (6 mm)
- Oven for jars: 275°F (135°C) for 10–15 min
- Boil lids/bands: 5 minutes
- Optional seal: invert 5 min
- Target set temp: ~220°F (104°C) at sea level
I follow these steps every time to keep the marmalade safe, bright, and ready to use.
Serving Ideas I Love
I use my satsuma marmalade in simple ways that bring bright citrus to everyday dishes.
- Spread on toast or warm scones for a quick, tasty breakfast. I slather it over buttered bread so the marmalade cuts the richness and adds a lively, sweet-tart note.
- Brush it on roasted chicken, pork, or duck during the last 10–15 minutes of cooking. The heat sets a glossy, sticky glaze that adds sweetness and a slight tang.
- Stir a spoonful into plain Greek yogurt or dollop it onto cottage cheese. It gives a fresh fruit lift that makes a plain snack feel special.
I also mix the marmalade into dressings and serve it with cheese.
- Whisk marmalade with olive oil, vinegar, and a touch of mustard for a bright vinaigrette. It livens green salads and grain bowls without overpowering them.
- Offer a small jar on a cheese board alongside Brie, goat cheese, or other creamy varieties. The sweet-citrus contrast highlights the savory cheeses.
Quick-reference serving table
| Use | How I apply it | Good pairings |
|---|---|---|
| Toast & scones | Spread over buttered warm bread | Butter, fresh bread |
| Meat glaze | Brush on near end of roasting | Chicken, pork, duck |
| Yogurt/cottage cheese | Stir in or spoon on top | Greek yogurt, cottage cheese |
| Salad dressing | Whisk with oil, vinegar, mustard | Mixed greens, grain bowls |
| Cheese board | Serve in a small dish beside cheeses | Brie, goat cheese |
I recommend small experiments: add a pinch of chili flakes to the glaze, a splash of balsamic to the dressing, or warm the marmalade slightly before spreading. These small changes let you tailor the marmalade to sweet, savory, or spicy dishes without losing its fresh satsuma character.
Tips for the Perfect Satsuma Marmalade
1. Pick Ripe, Healthy Fruit
I choose satsumas that feel firm and look bright orange.
Avoid any with soft spots, splits, or mold so the marmalade stays fresh longer.
Medium-sized fruits often give a good peel-to-pulp ratio for texture and yield.
2. Remove Peel and Bitter Pith Cleanly
I peel only the colored skin with a sharp paring knife or zester, leaving most of the white pith behind.
Then I slice the peel into thin strips, about 1/4 inch wide, so they cook evenly and give a pleasant bite.
I also segment the fruit carefully and remove every seed to prevent extra bitterness.
3. Balance Sweetness and Tang
I start with a ratio that keeps the marmalade bright and not overly sweet.
If my satsumas are very sweet, I cut back the sugar slightly. I always add fresh lemon juice to help the natural pectin gel and sharpen the flavor.
Small adjustments taste-tested during cooking keep the balance right.
4. Cook Gently and Stir Often
I cook the mixture over medium heat to avoid scorching the sugar.
I stir regularly, especially near the end, to keep peels suspended and prevent sticking.
If the marmalade begins to foam, I skim gently and continue cooking until it reaches the right texture.
5. Check for the Right Set
I use one or more simple tests to check the set:
- Spoon test: let a drip from a spoon hold its edge and wrinkle slightly.
- Plate test: chill a small spoonful on a cold plate for 1–2 minutes; it should wrinkle when poked.
- Thermometer: aim for about 220°F (104°C) for a full set.
If it’s not ready, I cook a few minutes longer and test again.
6. Sterilize and Seal Jars Safely
I wash jars and lids well with hot, soapy water first.
Then I warm jars in a 225°F oven for about 10 minutes and boil lids for several minutes before using.
I fill jars hot and seal immediately to lower contamination risk and extend shelf life.
7. Improve Texture If Needed
If I want a firmer gel, I add a measured spoon of pectin early in the cook, following the package guidelines.
I avoid over-thickening; small additions give a controlled, pleasant texture.
For a smoother spread, I chop peels finer or cook a little longer to soften them.
Closing Thoughts
I love how satsuma marmalade turns a few simple ingredients into a bright, useful condiment. When I take care with peeling, cooking, and sterilizing jars, the jam sets well and stores safely. I use it on toast, stirred into yogurt, or brushed over roasted meats to add a fresh citrus punch. Small steps during preparation make a big difference in flavor and shelf life, so I value patience and attention while I make each batch.
Frequently Asked Questions
What ingredients do I need for satsuma marmalade?
I use peeled, segmented satsumas as the base. I add granulated sugar and water for sweetness and body, plus fresh lemon juice for brightness and acidity. If I want a firmer set, I sometimes add a small amount of pectin.
How should I get satsumas ready before cooking?
I wash each fruit, then peel carefully to keep most of the zest and avoid the bitter white pith. I segment the satsumas, remove seeds, and trim any excess pith so the marmalade stays bright and not bitter.
What tools are useful for making marmalade?
I work with a large heavy-bottomed pot and a sharp paring knife. I keep measuring cups handy. For extra control I use a fine mesh strainer and a candy thermometer, though they are optional.
How long do I simmer the marmalade mixture?
I usually cook it for about 25–30 minutes, stirring often. I watch for visible thickening and reduced liquid before I start testing for set.
How can I check whether the marmalade is set?
I try the spoon test, the chilled plate test, or check the temperature with a thermometer. If it still runs, I cook a little longer and test again.
What is the proper way to sterilize jars?
I wash jars and lids, heat the jars in the oven or in boiling water, and boil the lids briefly. I fill the hot jars with hot marmalade right away to help form a good seal.
How long will homemade satsuma marmalade keep?
Sealed jars stored in a cool, dark place stay good up to a year. Once opened, I keep jars refrigerated and use them within a few weeks for best quality.
How can I serve satsuma marmalade?
I spread it on toast or scones, stir a spoonful into yogurt or cottage cheese, brush it on meats as a glaze, add to salad dressings, or pair it with cheeses on a board.
Is pectin okay to use in satsuma marmalade?
Yes. I add about a tablespoon of pectin if I want a firmer gel. Using pectin is optional and depends on the texture I prefer.
What practical tips help ensure success?
I choose ripe satsumas, peel carefully to avoid bitterness, balance sugar and lemon, follow cooking times, and sterilize jars properly to preserve freshness.
FAQs
Q1: What makes satsuma marmalade different from other marmalades?
I find satsuma marmalade milder and less bitter than traditional orange marmalades. Satsumas have thin, easy-to-remove peels and a sweet-tart flesh, so the final spread often tastes brighter and sweeter. That means you usually need less added sugar to balance the flavor.
Q2: Is satsuma marmalade safe to store without added commercial pectin?
Yes. I often cook satsuma marmalade without commercial pectin by simmering the peel and pulp until natural pectin sets the jam. To ensure safety and a reliable set, I use a tested recipe, follow proper hot-jarring steps, and refrigerate opened jars. Low-sugar versions may benefit from Pomona’s Universal Pectin if I want a firmer set with less sugar.
Q3: How long will homemade satsuma marmalade keep?
Unopened, properly canned jars stored in a cool, dark place will last up to a year. After opening, I keep the jar in the fridge and use it within 1 to 3 months for best quality. If I see mold, off-odors, or cloudy syrup, I discard the jar.
Q4: How can I reduce bitterness while keeping peel texture?
I grate or slice the peel thinly and blanch it in boiling water for 1–2 minutes, repeating once or twice. I then drain and rinse the peel before cooking. This removes excess bitterness while keeping the peel pieces intact for texture.
Q5: Can I use satsuma marmalade for things other than toast?
Absolutely. I use satsuma marmalade as a glaze for roasted meats, a filling for pastries, or a topping for yogurt and ice cream. Its sweet-tart profile pairs well with savory dishes and baked goods.
Q6: How does satsuma marmalade compare to marmalades made from other mandarins?
Satsumas are typically sweeter and less acidic than many other mandarins. When I swap clementines or tangerines, I often adjust sugar and lemon juice to match acidity and achieve the same set. Texture and peel thickness can change the final mouthfeel.
Q7: What maintenance do jars and equipment need after making marmalade?
I wash jars, lids, and utensils in hot, soapy water and inspect rims for nicks. If I water-bath can, I sanitize jars before use and process them according to recommended times. After canning, I store jars in a cool, dry place and label them with dates.
Conclusion
I recommend making satsuma marmalade when you want a bright, easy citrus spread that keeps well. I find the shallow peel and sweet-tart flesh of satsumas yield a jam with clear, fresh flavor and a pleasing texture without harsh bitterness.
- Effectiveness: This marmalade works great on toast, biscuits, and as a glaze for meats. Small batches set reliably when cooked to the right temperature or tested with a chilled plate.
- Safety: I follow simple food-safety steps—clean jars, proper boiling, and hot-fill or water-bath canning—to keep the preserve safe to store.
- Eco-friendliness: Using seasonal satsumas, minimal added pectin, and reusable jars reduces waste. Making marmalade at home also cuts packaging and transport impacts compared with store-bought options.
- Suitability: The recipe fits beginners and experienced cooks. You can tweak sugar, spice, or peel thickness to suit dietary needs and taste.
Choose ripe satsumas and a trusted method for consistent results. I encourage you to try a small jar first, adjust to your taste, and store extras in the fridge or safely canned for long-term use. Enjoy making and sharing a bright, homemade marmalade.