
Bariatric Cheesecake Recipe: Low-Sugar, High-Protein Mini Cheesecakes
I know how hard it can be to miss favorite desserts after bariatric surgery, so I created a cheesecake that fits the needs of people on post-surgery diets. I focus on using higher-protein, lower-carb ingredients and careful portioning so the dessert stays gentle on your stomach while still tasting creamy and satisfying.
My recipe uses simple swaps and clear steps to keep calories and carbs in check without losing the classic cheesecake texture. It works for different stages of recovery and for anyone who wants a healthier, tasty treat that supports long-term goals.
Key Takeaways
- The recipe balances flavor with bariatric-friendly nutrition.
- Ingredients and portions aim to reduce carbs and boost protein.
- Directions and tips help prevent digestive issues and simplify preparation.
What Is Bariatric Cheesecake
Nutritional Profile Highlights
I focus on recipes that boost protein and cut carbs. A typical bariatric cheesecake gives much more protein per serving than regular versions, often by using Greek yogurt, low-fat cream cheese, or protein powder. I keep sugars very low, usually swapping in sugar-free sweeteners. Calories are smaller too, since portions are controlled and ingredients aim for nutrient density over empty energy.
Main Characteristics
I design these cheesecakes to be small, filling, and made from ingredients that support recovery and satiety. Common choices include high-protein dairy, sugar substitutes, and low-carb crusts or no crust at all. I make each serving intentional: compact size, clear macronutrient goals, and a texture that mimics traditional cheesecake without the heavy fats or excess sugars.
How It Fits Post-Surgery Diets
I align the dessert with typical post-bariatric needs: wound healing, steady blood sugar, and long-term weight goals. The recipe choices help meet protein targets, limit rapid carbohydrate spikes, and offer a controlled treat that supports both physical recovery and emotional satisfaction.
Ingredients
Crust / Base
- 1 cup almond flour
- 2 tbsp powdered erythritol
- 3 tbsp melted unsalted butter
- 1/4 tsp ground cinnamon
- Pinch of salt
I press this mixture into the pan to form an even, firm crust.
Filling / Cheesecake Mix
- 16 oz reduced‑fat cream cheese, room temperature
- 1/2 cup plain Greek yogurt
- 2 large eggs
- 1/4 cup sugar‑free vanilla protein powder
- 3 tbsp powdered monk fruit sweetener
- 1 tsp vanilla extract
- 1/4 tsp salt
I blend these until smooth and creamy, then pour over the prepared base.
Extras / Toppings (Optional)
- 2 tbsp sugar‑free whipped cream
- 1/4 cup fresh berries (strawberries or raspberries)
- 1 tbsp sliced almonds
- Small dash of cinnamon
I add toppings after the cheesecake cools to keep texture and flavor fresh.
Equipment Needed
Baking Gear I Use
- 7-inch springform pan (nonstick) — gives the cheesecake a neat shape and lifts out cleanly.
- Unbleached parchment paper — lines the pan so the cake won’t stick and removes easily.
- Rimmed baking sheet — supports the pan and catches spills during baking.
- Heavy-duty aluminum foil — I wrap the pan to protect it when using a water bath.
- Digital instant-read thermometer — I check the center temperature to avoid overbaking.
Tools for Mixing and Measuring
- Stand mixer (electric) — I use it for smooth, even batter with less effort.
- Stainless steel mixing bowls (varied sizes) — I keep several on hand for different steps.
- Silicone spatula (heat-resistant) — I scrape bowls and gently fold ingredients.
- Balloon whisk — I use it to make the cream cheese mixture silky and lump-free.
- Measuring cups and spoons (stainless steel) — I measure precisely for consistent results.
Prep Work
Ingredient Ready-List
I get all ingredients to the right state before I start. I take cream cheese out 30–45 minutes early so it softens and blends smoothly. I bring eggs to room temperature and separate them if the recipe calls for whites or yolks to keep the batter consistent.
I sift protein powder to remove lumps and weigh sweeteners on a digital scale for accurate portions.
Quick checklist:
- Cream cheese — room temp 30–45 min
- Eggs — room temp 20–30 min, separated if needed
- Protein powder — sifted
- Sweetener — measured by weight
I follow simple steps to avoid lumps and uneven texture. Temperature matters for a smooth, creamy result and for proper protein integration.
Workspace and Tools
I arrange my kitchen so everything sits within reach. I clear a counter space near the mixer and place mixing bowls in order of use. I line or cut parchment paper and prep the springform pan and a rimmed baking sheet in advance. I keep a silicone spatula, whisk, measuring tools, and an instant-read thermometer close by.
Setup items:
- Stand mixer on stable surface
- Bowls arranged by size
- Parchment and pan ready
- Measuring scale and spoons handy
- Thermometer accessible
I keep the room around 70°F and avoid drafts when possible. A tidy, well-lit workspace helps me work faster and with fewer mistakes.
Step-by-Step Instructions
Creating the Base
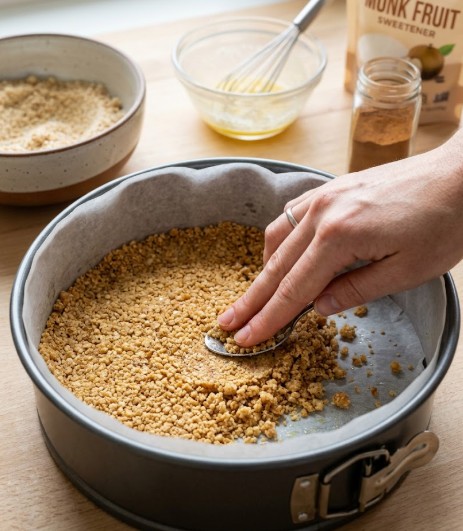
I mix the dry ingredients in a bowl: 1 cup almond flour, 2 tablespoons powdered erythritol, 1/2 teaspoon ground cinnamon, and a pinch of salt.
I melt 3 tablespoons unsalted butter and pour it into the dry mix. I stir until the texture looks like coarse crumbs.
I line a 7-inch springform pan with parchment paper. I press the crumb mix firmly and evenly into the bottom of the pan.
I bake the crust at 325°F for 8–10 minutes, then remove it and let it cool fully.
Making the Cheese Filling
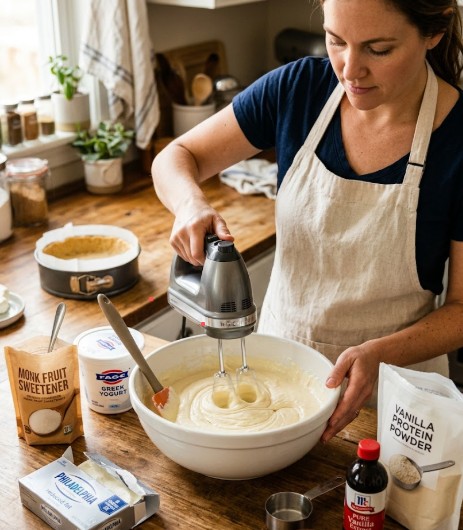
I bring 16 oz reduced-fat cream cheese to room temperature so it whips smoothly. I beat the cream cheese until it’s very soft, then add 1/2 cup Greek yogurt and mix until blended.
I add 2 large eggs, 1/4 cup sugar-free vanilla protein powder, 3 tablespoons powdered monk fruit sweetener, 1 teaspoon vanilla extract, and a pinch of salt. I mix gently until the filling is smooth and uniform.
I scrape the bowl sides and stop mixing as soon as the batter is even to avoid extra air bubbles.
Oven Setup and Baking
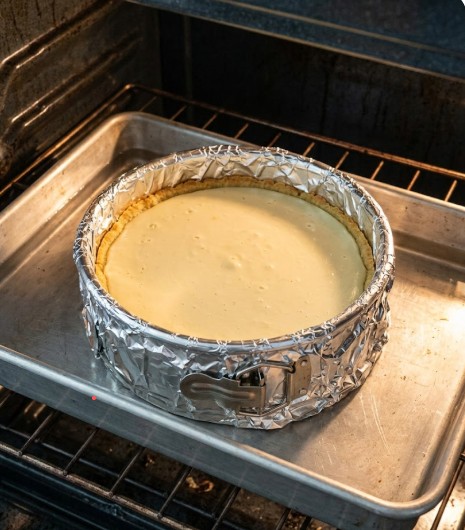
I preheat the oven to 325°F and place the springform pan on a rimmed baking sheet. I wrap the outside of the pan with heavy-duty foil to prevent water from leaking in.
I set up a water bath by pouring hot water into the baking sheet so it reaches about halfway up the pan sides. This gives me slow, even heat.
I bake the cheesecake for 35–40 minutes. I look for set edges and a slightly jiggly center. I check the center temperature; it should reach about 150°F.
Cooling and Final Setting
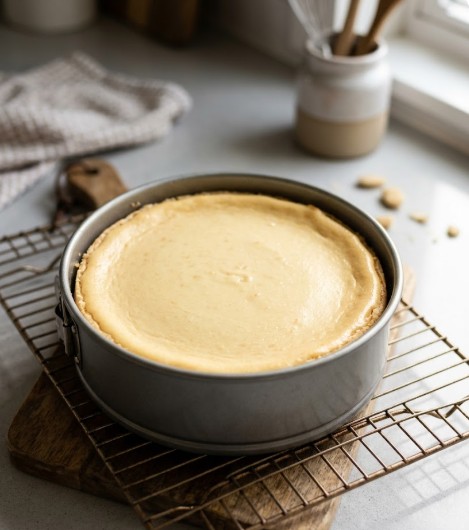
When baking finishes, I turn off the oven and open the door a crack. I let the cheesecake rest inside the warm oven for about 1 hour to cool gradually. This lowers the chance of cracks.
I then remove the pan and let it cool at room temperature until fully cool. I chill the cheesecake in the refrigerator for at least 4 hours, preferably overnight, so the texture firms up.
I use an instant-read thermometer when needed for accuracy and avoid opening the oven while baking to keep the cake stable.
Nutrition Information
Calorie Details
I designed each serving to be modest in calories so it fits post-surgery plans.
- Typical range: 120–150 kcal per serving.
- Calories from fat usually sit around 80–100 kcal.
- Calories from protein typically cover 30–40 kcal.
This keeps portions small but satisfying while helping manage daily calorie targets.
Protein Amounts
I focused on protein to support healing and muscle maintenance.
- Protein powder: 8–10 g per serving.
- Dairy sources (cream cheese + Greek yogurt): 5–7 g per serving.
- Expected total protein: about 12–15 g per serving.
I prioritize high-quality protein so each bite helps meet post-op protein goals.
Macronutrient Breakdown
I balanced the macros to favor protein and limit carbs and fat.
- Protein: 12–15 g (~40–45% of calories)
- Fat: 8–10 g (~35–40% of calories)
- Net carbs: 3–5 g (~15–20% of calories)
Key points:
- Low in carbohydrates.
- Controlled fat content.
- Made with reliable protein sources.
Storage Tips
Chill-and-Serve Directions
I store the cheesecake in an airtight container in the fridge to keep it moist and tasting fresh. Use a sealed glass or plastic container and place it in the coldest part of the refrigerator, away from strong odors.
- Ideal fridge temperature: 34–40°F (1–4°C)
- Keep refrigerated up to 3–5 days
- Cover with plastic wrap or foil for extra protection
I also recommend using a container with a tight lid to stop drying and flavor transfer. If you need to transport a slice, press a piece of plastic wrap directly onto the surface before closing the container.
Long-Term Cold Storage
When I need to save cheesecake longer, I freeze it following these steps to keep texture and taste intact. For single slices, I wrap each slice in plastic wrap, then a layer of foil, and freeze up to 2 months. For a whole cake, I use a freezer-safe container and store up to 1 month.
- Let the cheesecake cool fully before freezing
- Label with date and contents to track freshness
- To thaw, move it to the refrigerator and leave overnight
I slice before freezing whenever possible. That makes portioning and reheating or serving faster and reduces thaw–refreeze cycles.
Modifications and Variations
Lower-Sugar Choices
I swap regular sweeteners for zero-calorie options to cut sugar without losing taste.
- Use stevia or monk fruit drops instead of honey.
- Try erythritol or a zero-calorie sweetener blend and lower the total sweetener by about 25%.
- Choose sugar-free vanilla extract for extra flavor.
Quick tip: Start with small amounts and taste; some sweeteners can be stronger than sugar.
Non-Dairy Substitutes
I make the cheesecake dairy-free by replacing dairy with plant-based creams and proteins.
- Use full-fat coconut cream or a cashew cream cheese in place of Greek yogurt or cream cheese.
- Silken tofu works well as a smooth, protein-rich binder.
- Almond-based cream cheese spreads also give a familiar texture.
Texture note: If the filling feels thin, chill it longer or add a small amount of cornstarch or extra protein powder.
Ways to Raise Protein
I boost protein without changing flavor much by folding powders or toppers into the recipe.
- Stir unflavored whey, collagen peptides, or pea protein into the cheesecake base.
- Add protein powder to the crust for an extra hit.
- Finish with protein crisps or a sprinkle of powdered protein as a garnish.
Measure: Follow package serving sizes to keep texture and taste balanced.
Tips for Bariatric Patients
Control Your Portions
I weigh and measure dessert servings to avoid overeating. Aim for about 2–3 ounces per serving and try to include roughly 12–15 grams of protein when possible. Keep each portion near 120–150 calories to stay within typical post-op targets.
Practical steps I use:
- Use a food scale or measuring cup.
- Slice cheesecake into pre-measured pieces or bake in small ramekins.
- Freeze single portions so I only thaw what I plan to eat.
I treat portioning as a tool for steady progress, not punishment.
How and When to Serve
I plan desserts as part of a meal strategy, not as random snacks. I eat slowly, take small bites, and stop if I feel full or uncomfortable.
Tips for pairing and timing:
- Enjoy the dessert a few times a week (about 2–3 times) rather than daily.
- Pair with a lean protein or add protein powder or Greek yogurt to raise the protein per bite.
- Choose low-sugar options or sugar-free toppings like a fruit compote made with sugar substitute.
Digestive and tolerance notes:
- Chew very well and avoid washing bites down with large sips of liquid.
- Test tolerance slowly after surgery and adjust sweetener or texture as needed.
- Check that each serving meets your protein and sugar goals before eating.
Closing Thoughts
I created this cheesecake to make dessert fit a recovery plan without losing flavor. It uses higher-protein, lower-sugar ingredients to help support healing and steady progress.
I focus on portion control and texture so each serving is gentle on the stomach and satisfying. The recipe blends practicality with taste, giving you a sweet option that aligns with long-term goals.
Try it and adjust spices or toppings to match your needs. Small changes let you keep variety while staying on track. This dessert aims to be a helpful tool in your journey, not a setback.
Frequently Asked Questions
What exactly is a post-op friendly cheesecake?
A post-op friendly cheesecake swaps heavy ingredients for ones that give more protein and fewer carbs. I use items like Greek yogurt, protein powder, and low-carb crusts or no crust at all. The goal is a creamy dessert that fits bariatric nutrition rules and smaller portion needs.
Who benefits most from this kind of cheesecake?
People who have had weight loss surgery benefit most, as do anyone on a high-protein or low-carb plan. I recommend it for those who need controlled portions and steady protein to support recovery, muscle maintenance, or weight goals. It also helps people who want a treat without breaking their dietary plan.
How much protein will I get per serving?
A typical slice offers about 12–15 grams of protein. I reach that level by adding concentrated protein sources like Greek yogurt or protein powder. That protein helps with fullness and healing after surgery.
Which sugar alternatives work best?
I use low-calorie, low-glycemic sweeteners such as stevia, monk fruit, or erythritol. These sweeteners give taste without raising blood sugar or adding many calories. Pick one you tolerate well and that won’t upset your digestion.
What is the right serving size for this dessert?
I portion servings at about 2–3 ounces each and weigh them for accuracy. Measuring keeps calories and carbs in check and prevents overeating. Pre-portioning into small slices or ramekins makes it easier to stick to your plan.
Can I freeze extra cheesecake?
Yes. I wrap individual slices tightly in plastic wrap and then foil to avoid freezer burn. Stored this way, portions keep well for up to three months. Thaw slices overnight in the fridge before eating to keep the best texture.
Are there non-dairy options I can use?
I replace dairy with coconut cream, silken tofu, or plant-based protein powders when needed. These swaps let people with lactose intolerance or dairy allergies still enjoy a protein-rich, low-carb version. Texture and flavor will vary, so try small batches to find what you like.
How long will it last in the fridge?
I store cheesecake in an airtight container and use it within 3–5 days. I label the container with the date and keep it at or below 40°F. For longer storage, I freeze individual portions as described above.
FAQs
Q1: Will this cheesecake fit my post-bariatric diet?
I design recipes to match common post-surgery goals: higher protein, lower sugar, and smaller portions. Check your specific stage (liquid, pureed, soft, solid) and protein targets. I recommend using fat-free dairy or Greek yogurt and a protein boost like protein powder to meet your needs.
Q2: Is this dessert safe after surgery?
Yes, when you follow your surgeon or dietitian’s timing and texture rules. I advise waiting until your care team clears you for soft or solid foods. Start with small bites and stop if you feel pain, nausea, or vomiting.
Q3: How much protein and calories will one serving usually have?
Protein and calories vary by ingredients. Typical bariatric cheesecake versions aim for 10–20 g protein and 100–250 calories per small serving. I suggest calculating values using your exact brands and portion size to stay within your daily plan.
Q4: How do I make it work without a crust?
A crust-less cheesecake reduces added carbs and fats and lowers portion size. I blend cream cheese (or Neufchâtel) with Greek yogurt, eggs or egg substitute, and a sugar-free sweetener. Bake or chill, depending on the recipe, for a smooth, dense texture.
Q5: Can I add flavors or seasonal variations?
Yes. I add vanilla, lemon, pumpkin spice, or fruit purees in small amounts for flavor. Keep additions low in sugar and watch portion size. For pumpkin or fruit, use canned pumpkin or unsweetened fruit and mix with protein and spices.
Q6: How does this compare to regular cheesecake?
Bariatric-style cheesecake has less sugar, less fat, and smaller portions than traditional cheesecake. I replace full-fat ingredients with lower-fat or high-protein options and use sugar substitutes to lower calories while keeping creaminess.
Q7: What should I watch for when storing and reheating?
Store cheesecake in the fridge for 3–5 days in an airtight container. Freeze in single portions for up to 1 month. I thaw in the fridge and serve chilled or at room temperature; avoid reheating in a way that changes texture or concentrates sugars.
Final Thoughts
I recommend trying a bariatric-friendly cheesecake when you want a safe, satisfying dessert that supports your recovery and goals. I focus on recipes that boost protein, cut added sugars, and use lower-fat or reduced-sugar ingredients so the dessert fits post-op nutrition needs without losing flavor.
I value safety and ease. I choose simple steps and soft textures that match post-surgery stages, and I pay attention to portion size to protect my progress. Using high-protein mixes, fat‑free Greek yogurt, or low-fat cream cheese keeps the recipe effective and diet-friendly.
I prefer ingredients that are gentle on the body and kinder to the planet, like reduced-packaging protein powders or plain yogurt from responsible brands. These choices help reduce waste and keep the recipe more sustainable.
I urge you to pick a trusted recipe and reliable ingredients you can follow over time. If you stick with safe preparations and sensible portions, this cheesecake can be an enjoyable, practical part of long-term eating after bariatric surgery.