Neiman Marcus Chicken Broth Recipe: Classic Rich Stock for Soups and Sauces
I love the simple comfort of a warm bowl of broth. When I make Neiman Marcus Chicken Broth, I focus on clear, rich flavor and slow, careful cooking so each sip feels soothing and balanced.
In this article I will walk through what makes this broth special, the key ingredients, and practical tips to get great results at home. I will also cover storage, serving ideas, and easy variations so you can enjoy the broth in many meals.
Key Takeaways
- The broth delivers warm, well-rounded flavor from simple, slow-cooked ingredients.
- Clear instructions and small tips make the recipe easy to replicate at home.
- You can store, vary, and pair the broth with many dishes for flexible use.
What I Know About Neiman Marcus Chicken Broth
I recognize this broth as a rich, well-loved stock linked to the Neiman Marcus dining tradition. I make it using chicken pieces, aromatic vegetables, and fresh herbs simmered slowly to draw out deep, savory flavors.
I use it as a base for soups and stews or to warm a bowl on a cold day.
- Main components: chicken, carrots, celery, onions, and herbs.
- Texture and taste: clear yet full-bodied, with a comforting aroma.
Why I value it: it focuses on simple, high-quality ingredients and slow cooking to create a versatile, flavorful liquid for many dishes.
Why I Love This Neiman Marcus Chicken Broth
I make this broth because it tastes like real comfort—rich, warm, and deeply savory. The mix of chicken, carrots, celery, and herbs gives a natural sweetness and layered flavor that store-bought broths usually lack.
I use it for many meals. It becomes a soup base, the liquid for risotto, or a flavorful substitute for water when cooking rice and grains. A single batch stretches across several dishes and saves time on busy nights.
I also like that I control every ingredient. No additives, just whole food components that build a cleaner, more nourishing stock. It boosts the nutritional value of recipes without extra effort.
Finally, making this broth feels rewarding. Watching bones, vegetables, and herbs turn into a clear, fragrant liquid gives me a quiet sense of accomplishment I enjoy every time.
The Ingredients
I gather fresh, simple items to build a rich chicken broth. I use 5 pounds of mixed chicken parts, 10–12 cups of water, and 2 crumbled chicken bouillon cubes for depth. I add 2 cups chopped celery, 1 cup diced carrots, and 2 cups onion quarters for aromatics.
I include 3 smashed garlic cloves, 3 sprigs fresh thyme, a small bunch of parsley stems, and 1 dried bay leaf for herbal notes. I season with 1 teaspoon whole coriander seeds, 5 whole black peppercorns, and 1 tablespoon apple cider vinegar to help extract flavor.
Step by Step Instructions
Step 1: Gather everything you need

I lay out all ingredients and tools before I start.
This includes the chicken pieces, vegetables, herbs, spices, a large stockpot, a fine mesh strainer, and jars for storage.
Having items ready saves time and keeps the process smooth.
Step 2: Put the chicken in the pot

I place mixed chicken parts (thighs, wings, breasts) with the skin on into a big stockpot.
The skin and bones help build a richer flavor.
I arrange pieces so they sit evenly in the pot.
Step 3: Prepare the vegetables

I coarsely chop the celery into medium pieces so it releases flavor but holds shape.
I peel and dice the carrots and cut the onions into quarters.
I smash the garlic cloves lightly instead of mincing, to give a subtle garlic note.
Step 4: Add the herbs and spices
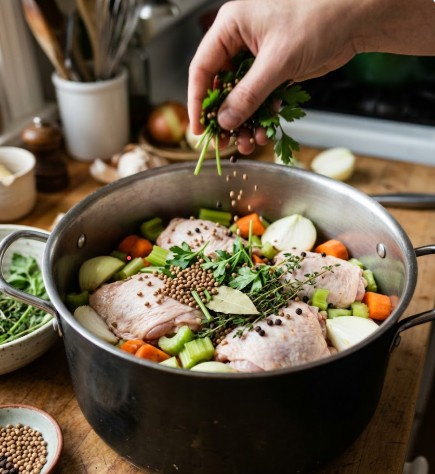
I toss the chopped vegetables into the pot with the chicken.
Then I add parsley stems, whole coriander seeds, black peppercorns, thyme sprigs, and a bay leaf.
These aromatics create a balanced, savory base.
Step 5: Add cold water to cover

I pour cold water over everything until ingredients are fully submerged, about 10–12 cups depending on pot size.
Making sure all pieces sit under water helps extract flavor evenly.
I leave a small gap at the top to avoid boiling over.
Step 6: Bring to a simmer and cook low and slow
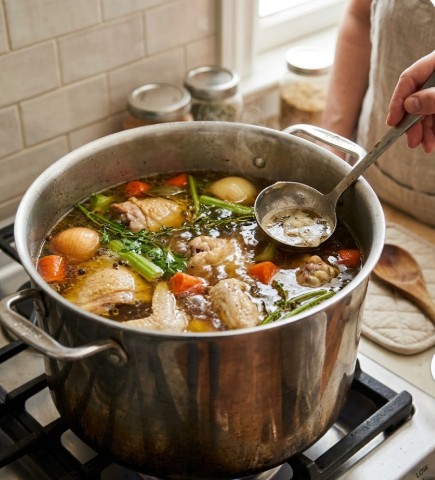
I heat the pot until it reaches a gentle boil, then lower the heat to maintain a soft simmer.
I let it cook uncovered for about 4–6 hours, checking occasionally.
I skim foam and impurities from the surface with a spoon to keep the broth clear.
Step 7: Add vinegar and bouillon midway

Around the halfway point, I pour in a splash of apple cider vinegar to help draw minerals from the bones.
I also crumble in bouillon cubes for added depth if desired.
I stir gently and continue simmering.
Step 8: Strain the liquid

When the broth has finished cooking, I turn off the heat and set a fine-mesh strainer over a large bowl or pot.
I pour the broth through the strainer, using a ladle to move liquid through and leaving solids behind.
I discard the solids once I’ve extracted all the liquid.
Step 9: Cool and store safely

I let the strained broth cool to room temperature before transferring it to jars or containers.
I refrigerate it for use within a few days or freeze portions for longer storage.
I label containers with the date to track freshness.
Step 10: Serve or use as a base

I use the broth as a soup base, in sauces, or sip it plain for warmth.
I reheat gently on the stove to preserve flavor.
This broth also freezes well in ice cube trays for small portions.
Tips & Tricks
I like to add bones when I make broth; they give the stock more body and a richer mouthfeel.
A small splash of dry white wine during the simmer adds brightness, but don’t overdo it.
Keep the pot at a gentle simmer — boiling makes the liquid cloudy and can taste harsh.
I often throw in fresh herbs I have on hand, such as rosemary, dill, or oregano, to vary the flavor.
I also use tired vegetables that need to be used up; it saves money and boosts the broth’s depth.
- Strain well for a clear stock.
- Chill and skim fat for a cleaner finish.
Nutrition Facts Snapshot
I list key nutrients per 1 cup (240 ml) serving:
- Calories: ~35–60 kcal
- Protein: 6–8 g
- Fat: 1–3 g (mostly from chicken skin if used)
- Carbohydrates: 0–2 g
- Sodium: 400–900 mg (varies by added salt)
- Collagen/Gelatin: Present if broth cools and gels
- Vitamins & Minerals: Small amounts of potassium, phosphorus, and B vitamins
Notes: Use low-sodium salt and remove excess fat to lower sodium and fat. Homemade batches vary by ingredients and cooking time.
Can I Keep Neiman Marcus Chicken Broth?
I store my broth in airtight jars in the refrigerator for up to five days.
For longer storage, I freeze portions—ice cube trays work well for single-serving amounts.
- Refrigerate: airtight containers, up to 5 days
- Freeze: portion into trays or bags, label with date, use within months
What to Pair with Neiman Marcus Chicken Broth
I like using this broth in simple, tasty ways that boost flavor without fuss.
- Chicken noodle soup: Add cooked noodles, shredded chicken, and carrots for a classic bowl.
- Risotto: Stir warm broth in slowly for a creamy, rich risotto.
- Cooking grains: Simmer rice or quinoa in broth to make them more flavorful.
- Braising: Use the broth to braise chicken or pork for deeper taste.
- Vegetable soup: Toss in mixed vegetables and simmer for a light, healthy soup.
Variations
Ingredients I swap or add
I often change the base mix to suit the dish I want. For a fresh summer soup, I add fresh basil or dill. For heat, I include sliced jalapeño or a pinch of crushed red pepper.
When I want richness, I stir in coconut milk and a spoonful of curry paste near the end. For a savory, deep flavor I dissolve a tablespoon of miso paste into a small amount of hot broth before mixing it back in.
If I need a vegetarian version, I leave out the chicken and load the pot with extra carrots, celery, onions, mushrooms, and a few bay leaves, keeping the same spices for depth.
How I change the process
I follow the same basic technique but make small timing adjustments for each style. For herb-infused broth, I add delicate herbs like basil or dill in the last 10–15 minutes so their aroma stays bright.
For spicy broth, I add jalapeño slices early if I want background heat, or near the end for sharper spice. With coconut curry, I lower the heat before adding coconut milk and curry paste and simmer gently for 5–10 minutes so the flavors meld without breaking the milk.
When I make miso broth, I remove the pot from heat, dissolve the miso in a ladle of hot broth, then stir it back in to avoid killing the probiotics and to keep the flavor clean. For vegetable-only stock, I roast the vegetables first for 20–30 minutes to deepen the flavor, then simmer them with herbs and spices for 1–2 hours.
Nutrition changes you can expect
Swapping ingredients shifts calories and nutrients. Adding coconut milk raises calories and fat, mainly from saturated fat, and makes the broth more filling. Miso adds sodium and a small amount of protein, along with fermented foods’ potential gut-friendly compounds.
Using jalapeños or crushed red pepper adds negligible calories but boosts vitamin C and capsaicin. Leaving out chicken reduces protein and some minerals that bones release during long simmering. Roasted vegetables concentrate some flavors and slightly change carbohydrate and fiber content.
Useful tips and extra notes
I always taste and adjust salt near the end because reductions concentrate flavors. For herb versions, I tie soft herbs in a little bundle so I can remove them easily after cooking.
When using miso, I avoid boiling it. I mix it into warm broth off the heat to keep the flavor bright. For coconut curry, I add coconut milk at low heat to prevent separation.
I save strained solids to feed compost or add to a second quick stock; they still hold flavor. If I need a clearer broth, I chill it and skim the fat after it solidifies. I also add a splash of apple cider vinegar at the start of simmering when I want more mineral extraction from bones.
Quick reference:
- Herb version: add herbs at end, remove stems.
- Spicy version: add chiles early for mellow heat, late for sharp heat.
- Coconut curry: add coconut milk and curry paste at low heat near finish.
- Miso: temper miso off heat to preserve flavor.
- Vegetarian: roast vegetables first and simmer 1–2 hours.
These small changes let me adapt one base recipe into many different broths without starting from scratch.
Frequently Asked Questions
- Can I use rotisserie chicken I already cooked?
Yes. I often save the bones and extra meat from rotisserie chicken and add them to the pot. They give the broth more flavor and cut down on cooking time. - Do I need to remove the foam from the surface?
I recommend skimming the foam. It isn’t required, but taking it off makes the broth clearer and tastes cleaner. - Should I blend the broth for a silky finish?
I sometimes blend the finished broth when I want a smoother texture. Other times I leave it rustic with small pieces of meat and vegetables. - How do I know the broth is done?
I look for a deep golden color and tender meat that falls from the bones easily. - Is this broth safe for a gluten-free diet?
The basic broth is gluten-free. I check any added seasonings or bouillon to be sure they’re labeled gluten-free.
Final Thoughts
I enjoyed sharing how to make this rich chicken broth and hope it becomes a staple in your kitchen. The balance of simple, quality ingredients makes a big difference, and I find the slow simmer brings out a deep, comforting flavor.
Serve it on its own to warm the body, or use it as the base for soups, stews, and sauces that need extra depth. Keep a batch in the fridge or freezer so you always have a quick way to add homemade taste to any meal.
Try variations with herbs or vegetables to match your mood and season.
FAQs
- What makes my version of the Neiman Marcus chicken broth special?
I focus on a long, gentle simmer and a mix of chicken parts with bones to pull maximum flavor. I use basic aromatics—onion, carrot, celery—and a few whole spices like peppercorns and bay leaf. This gives a clear, rich broth without added fats or heavy seasonings. - How long should I simmer the broth for best results?
I simmer on low heat for 3–4 hours for a light broth and up to 6 hours for a deeper, more concentrated flavor. I keep the pot barely simmering and skim foam early to keep the liquid clear. - Is this broth safe to store, and how long does it last?
I cool the broth quickly, strain it, and refrigerate in airtight containers. It stays safe for 3–4 days in the fridge. For longer storage, I freeze it in portions for up to 3 months. - Can I use this broth as a base for other dishes?
Yes. I use it for soups, risottos, sauces, and to cook grains. Its clean flavor works well where you want chicken taste without overpowering other ingredients. - How do I reduce fat and improve clarity in the broth?
I chill the strained broth so fat solidifies on the surface, then lift it off. I also avoid a rapid boil and remove scum during the first hour. These steps keep the broth clearer and less greasy. - How does this homemade broth compare to store-bought options?
I find homemade broth has fresher flavor and fewer additives than most packaged broths. It may be lighter or richer depending on how long I simmer and which parts I use, while store broth varies in salt and preservative levels. - What simple tweaks can I make to change the flavor profile?
I add garlic or fresh herbs near the end for brightness, or parsnip and leek for a sweeter note. For a stronger savory punch, I roast the bones first or add a small amount of bouillon powder, tasting as I go.
Final Thoughts
I recommend trying the Neiman Marcus–style chicken broth if you want a rich, reliable base for soups and stews. I find it delivers deep flavor from simmered chicken parts and simple aromatics like onion, carrot, celery, garlic, thyme, and bay leaf.
- Effectiveness: This broth builds savory depth quickly and improves any dish that needs a solid flavor foundation.
- Safety: Use fresh chicken and keep good kitchen hygiene. Chill or freeze broth promptly to avoid spoilage.
- Eco-friendliness: Making broth lets you use leftover bones and vegetable trimmings, which reduces food waste.
- Suitability: It works well for weeknight meals, holiday dishes, or as a prep-ahead pantry staple.
I suggest preparing a large batch, portioning it, and freezing for long-term use. Choosing simple, high-quality ingredients gives the best results and keeps the broth versatile. I encourage you to make a pot this week and notice how it lifts your cooking.