
Dairy Queen Gravy Recipe — Copycat Southern-Style Brown Gravy Made Easy
I grew up loving the warm, peppery gravy Dairy Queen serves with their chicken strips. I wanted to recreate that simple comfort at home, so I tested a version using basic pantry ingredients until the texture and flavor felt right.
This homemade gravy comes together fast and needs no special skills or tools. I’ll walk you through a straightforward recipe that gives you that creamy, slightly peppered taste without a lot of fuss.
Key Takeaways
- The recipe recreates a creamy, peppered gravy with common pantry ingredients.
- It’s quick to make and requires only basic kitchen tools.
- Simple technique tips help you get the right texture and flavor.
Why You’ll Love This Dish…
I love how this gravy feels like a warm, familiar bite. It’s silky and rich, yet simple enough to make on a weeknight.
Bacon drippings give the gravy a smoky, savory base that lifts plain sides into something special. Freshly cracked pepper adds a mild heat that nudges your taste buds without overpowering the dish.
You only need five main ingredients and one pan, so it’s fast and low fuss. Use it on fries, chicken, biscuits, or mashed potatoes — it turns ordinary food into a cozy, flavorful meal. Simple, homey, and dependable every time.
Dairy Queen Gravy Ingredients
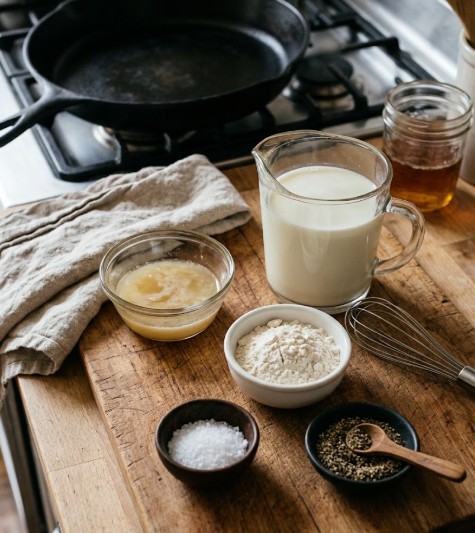
I keep the ingredient list simple so the gravy comes together fast and tastes rich. Below I show the items and why each one matters.
- Bacon grease — 1/4 cup
I use bacon fat for its smoky, savory depth. Butter can substitute, but the bacon grease adds a clear, hearty character. - All-purpose flour — 1/4 cup
This is the thickener. I whisk it into the hot fat to make a smooth roux that gives the gravy body. - Whole milk — 2 cups
I choose whole milk for creaminess and mouthfeel. Lower-fat milk thins the texture and weakens the flavor. - Salt — 1/2 teaspoon
I add salt to balance and enhance the other flavors without overpowering them. - Black pepper — 1/2 teaspoon
I use black pepper for a mild, peppery bite. I sometimes increase it a bit if I want more punch.
Quick reference (measures):
| Ingredient | Amount |
|---|---|
| Bacon grease | 1/4 cup |
| All-purpose flour | 1/4 cup |
| Whole milk | 2 cups |
| Salt | 1/2 tsp |
| Black pepper | 1/2 tsp |
Helpful Swaps
If I don’t have bacon drippings, I use butter for a rich base, knowing it won’t add smokiness. Sausage fat gives a meaty, savory kick that suits breakfast gravies. For dairy-free cooking, I choose plant-based butter or neutral oil; the texture stays fine but the flavor shifts.
For milk, I prefer whole milk for creaminess. I use 2% if needed but expect a thinner result. Oat or soy milk works best when avoiding dairy because they hold up better than almond milk.
Kitchen Tools I Use

- Medium saucepan — I cook the gravy in a mid-size pan for even heat.
- Whisk — I whisk constantly to keep the sauce lump-free.
- Measuring cups & spoons — I measure ingredients precisely for consistent results.
How I Make DQ-Style Pepper Gravy

I start by warming 1/4 cup bacon grease in a medium saucepan over medium-low heat until it melts but doesn’t smoke. I keep the heat gentle so the fat stays liquid without burning.
Next, I whisk in 1/4 cup all-purpose flour a little at a time. I add the flour slowly and keep whisking until it forms a smooth paste with no dry lumps. This step builds the roux that thickens the gravy.
I pour 2 cups whole milk in very slowly while whisking constantly. Slow pouring and quick whisking stop lumps from forming and gives a silky texture. I then season with 1/2 teaspoon salt and 1/2 teaspoon black pepper, tasting and adjusting if needed.
I cook the mixture over medium heat, whisking often. After about 4–6 minutes it will thicken and coat the back of a spoon. I watch closely to keep it right before a full simmer; if it bubbles too hard, I lower the heat.
When I take the pan off the heat, the gravy will thicken slightly as it cools. If it becomes too thick, I whisk in a little milk until it reaches the texture I want.
Recipe Perfection Tips
I keep the burner at medium or medium-low to protect the flavor and texture. High heat can scorch the flour or make the milk separate, so steady, moderate heat matters.
I whisk constantly when I add milk and while the gravy thickens. That motion stops lumps and keeps the sauce silky. If a few lumps form, I push the gravy through a fine mesh strainer to smooth it out.
I bring milk to room temperature before mixing it into the roux. Cold milk can shock the hot roux and cause clumps. I also watch the pour: the right gravy should coat a spoon yet still pour. Remember it will firm up as it cools, so I aim for slightly thinner than final.
I taste and tweak the seasoning as I go. Start with a basic pinch of salt and pepper, then adjust to match what you want.
How I Serve This DQ-Style Gravy
I spoon this gravy over hot, crisp fries or pile it on mashed potatoes and warm biscuits. I also dunk chicken tenders or drizzle it on roasted chicken and meatloaf for extra richness. For breakfast I smother eggs and hash browns. My favorite is poutine: fries, cheese curds, then steaming gravy. I keep a small thermos warm at gatherings so guests can ladle their own — it always disappears fast.
- Best with: fries, biscuits, mashed potatoes, chicken
- Breakfast: eggs, hash browns
- Party tip: serve warm from a thermos
Make Ahead & Storage Tips
I make this gravy ahead to save time. Once it cools, I transfer it to an airtight container and keep it in the fridge for up to 3 days. It will firm up when cold; I reheat it slowly on low heat and whisk in a splash of milk until it reaches the right pourable texture.
For longer storage, I freeze gravy in a freezer-safe container for up to one month. I thaw it overnight in the fridge, then warm it gently on the stove and stir in a little milk to restore creaminess before serving.
Dairy Queen Gravy Recipe FAQs
What goes into this gravy
- Fat: I use 1/4 cup bacon grease for flavor. Butter works fine as a swap if you prefer.
- Thickener: 1/4 cup all-purpose flour creates the roux that thickens the sauce. For a gluten-free version, I replace it with a rice-based gluten-free flour blend that thickens well.
- Liquid: 2 cups whole milk gives the creamiest result. If I only have 2% or skim, I add 1 tablespoon butter to boost richness.
- Seasoning: I add 1/2 teaspoon salt and 1/2 teaspoon black pepper, then taste and adjust.
Quick reference (per batch):
- 1/4 cup bacon grease or butter
- 1/4 cup flour (or gluten-free blend)
- 2 cups whole milk
- 1/2 tsp salt
- 1/2 tsp black pepper
How I make it and fix common problems
- Heat the fat: I warm the bacon grease (or butter) in a medium saucepan over medium-low until melted but not smoking.
- Make the roux: I add the flour slowly, whisking constantly, until it becomes a smooth paste with no dry spots.
- Add milk: I pour the milk in very slowly while whisking quickly to avoid lumps.
- Season and cook: I stir in salt and pepper, then keep whisking over medium heat until the gravy thickens, usually about 5 minutes. I reduce heat if it starts to boil too hard.
- Finish: I let the gravy cool a little; it will thicken more as it cools. If it becomes too thick, I thin it with a splash of milk.
Troubleshooting tips
- Lumpy gravy: Whisk constantly and add milk slowly. If lumps already formed, I blend with an immersion blender or strain through a fine sieve.
- Too thin: I simmer longer to reduce. If that fails, I mix 1 tablespoon flour with 2 tablespoons milk to make a slurry, then whisk it into the gravy and cook a few more minutes.
- Scaling up: I double every ingredient and use a larger pan. I keep a close eye on heat and whisk more often to prevent burning.
Nutrition snapshot (approximate per serving)
- Calories: ~185
- Total fat: ~15 g
- Sodium: ~390 mg
- Carbohydrates: ~9 g
- Protein: ~4 g
I recommend tasting as you go and adjusting pepper and salt to your preference.
Final Words
I like how a few simple steps deliver that creamy, peppered gravy you know from the chain. It warms meals and pairs well with fries, biscuits, or chicken. Try it and adjust salt or pepper to match your taste. If you make it, I hope you rate the recipe and tell others what worked or what you changed.
FAQs
- What makes this gravy taste like Dairy Queen’s?
I match the key traits: a smooth, creamy base, a mild savory stock flavor, and a noticeable black pepper bite. I use a roux of fat and flour, add milk for creaminess, and boost savory notes with a concentrated chicken base or bouillon. Freshly cracked black pepper finishes the flavor. - Is this gravy safe to eat for people with common food allergies?
I list main allergens: milk, wheat (from flour), and possible soy in some bouillon. If you or someone you serve has allergies, swap to safe ingredients: use a gluten-free flour or cornstarch, and choose a dairy-free milk or butter substitute. Always check labels on bouillon and other packaged items. - How do I get the right thickness every time?
I control thickness by the roux ratio and how much liquid I add. For medium gravy, use equal parts fat and flour, then slowly whisk in milk until smooth. If it’s too thin, simmer longer or whisk in a slurry of cornstarch and water. If too thick, thin with milk or stock a tablespoon at a time. - How long will homemade gravy stay good in the fridge and freezer?
I store gravy in an airtight container. In the fridge, it keeps 3–4 days. In the freezer, it lasts about 2–3 months. Reheat gently over low heat and whisk to restore smoothness. If texture separates, a quick whisk with a splash of milk brings it back. - Can I use this gravy with foods other than biscuits?
I recommend using it on chicken tenders, fries, mashed potatoes, biscuits, and sandwiches. Its peppered, creamy profile pairs well with salty, fried, or starchy foods. - How does this homemade version compare to store-bought mixes or restaurant gravy?
I find homemade gravy tastes fresher and lets you control salt, pepper, and thickness. Commercial mixes offer convenience and long shelf life but may include preservatives and a different texture. Restaurants use powdered mixes for consistency across locations, while homemade wins on flavor customization. - What small tricks improve flavor and texture?
I brown the roux lightly for a richer taste but avoid burning it. I season early and adjust at the end. Freshly cracked black pepper adds bite; a splash of hot water or stock can help blend concentrated bouillon without making the gravy too salty.
Final Thoughts
I tested and refined a simple, peppery gravy inspired by Dairy Queen. I found the best results come from a reliable base of fat and flour, gradual whisking with warm milk, and a steady simmer to reach a smooth, creamy texture. Seasoning with salt and plenty of black pepper gives the signature savory bite without masking the gravy’s mild richness.
Why this works:
- Consistent texture: whisking slowly and simmering gently prevents lumps.
- Safe and reliable: using cooked flour (roux) and heating milk to a simmer reduces food-safety risks.
- Versatile and eco-friendly: the basic ingredients are common, low-waste pantry staples that fit many meals.
I recommend using quality chicken base or stock for deeper flavor and freshly cracked pepper for the best aroma. For long-term use, store leftovers in an airtight container in the fridge for up to 4 days, or freeze in portions for up to 3 months.
I encourage you to try this at home and tweak the seasoning to your taste—small changes make a big difference.