

Bread Jesus Ate Recipe: Step-by-Step Baking Guide
I grew curious about the simple bread described in the Bible and wanted to try making it myself. I learned that this flat, plain loaf was a daily staple long ago and also held ritual meaning, so I set out to recreate its basic taste and texture using few ingredients and straightforward steps.
I found the recipe easy to adapt and quick to prepare, which made it ideal for both cooking and learning about history. My guide will walk you through what the bread is like, how to make it, and practical tips for serving and storing it, all without extra fuss.

Key Takeaways
- I explain what this ancient bread is and why it mattered.
- I show a simple method to make and customize the bread.
- I offer practical tips on serving, storing, and common questions.
What I Call the Bread of Jesus
I describe this bread as a very simple flat loaf made from four basic ingredients: wheat flour, cold water, salt, and olive oil. I shape the dough into thin rounds and cook them in a hot skillet until each side shows a light golden color and a few brown spots.
I use this bread in meals and small religious gatherings because it feels humble and direct. I see it as a practical food and a symbol — its plainness can represent presence and renewal, since each batch is mixed and cooked by hand.
- Ingredients: wheat flour, cold water, salt, olive oil
- Method: mix, shape into rounds, cook in a skillet
- Uses: everyday eating, ceremonial tables, simple communal meals
What It Tastes Like
I find this bread light and pleasantly chewy, with a mild olive oil note that never overpowers. The salt gives a gentle seasoning that makes each bite interesting without being strong. A crisp outer crust contrasts with a soft, airy inside, so textures balance well. I like it warm, and it pairs nicely with savory dishes, sauces, and dips.
How I First Learned to Make the Bread Jesus Ate
I found this bread while hunting for old, simple recipes from different cultures. As a Christian, the idea of making a bread tied to faith felt important, so I decided to learn how to bake it myself.
I discovered a plain recipe in an old cookbook and liked that it used few ingredients. I asked friends who knew the recipe for tips, then bought the basics and started baking. Kneading and shaping flat rounds felt straightforward, though I needed a couple tries to get the texture right.
The first loaves turned out rustic and satisfying. Friends who tasted them gave good feedback, which boosted my confidence. Making the bread became quick to do, and I kept improving by practicing small details like thickness and cooking time.
Baking this bread now feels both practical and calm. I often close my eyes while breaking a piece and picture the same kind of bread shared long ago. That simple act connects me to history and my faith in a quiet way.
Below are a few things I learned early on that helped me improve:
- Use simple, whole grains for an authentic flavor.
- Keep the rounds thin so they cook evenly.
- Cook on a hot surface for a slight char and firm texture.
- Don’t overwork the dough; gentle handling keeps it tender.
Making this bread became part of my routine and my spiritual practice. It gives me a sense of peace and reminds me why I wanted to learn it in the first place.
How I Make the Bread Jesus Ate?
I mix four simple ingredients: flour, water, salt, and a bit of oil. I combine, knead lightly, then divide into small rounds. I roll each thin and cook on a hot skillet until brown spots appear. I let them cool briefly, then serve warm.
Ingredients I Use
- 2 cups wheat flour — I pick regular wheat flour for its gluten, which gives the bread structure and a slight chew.
- 3/4 to 1 cup cold water — I add cold water slowly to control stickiness and keep the dough firm.
- 1 teaspoon salt — I use salt to boost flavor and help the dough hold together.
- 2 tablespoons organic olive oil — I mix in olive oil for a smooth texture and a mild, healthy flavor.
Notes: Measure flour by scooping and leveling. Adjust water a little if the dough feels too dry or too wet.
Step-by-step instructions
Step 1 — Mix and rest the dough

I combine whole wheat flour, cold water, salt, and a splash of olive oil in a large bowl. I knead until the dough feels smooth and a bit elastic. I cover it with plastic or a damp cloth and let it rest for about 30 minutes.
Step 2 — Portion and shape
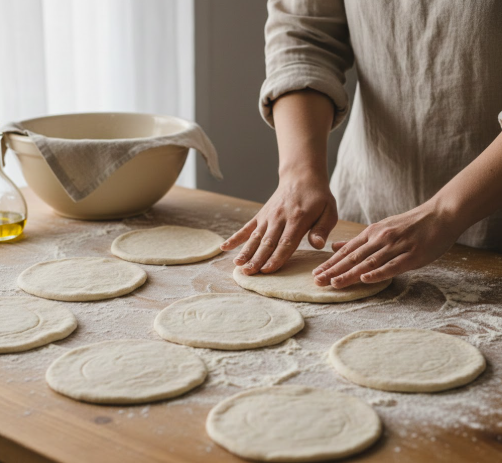
I divide the rested dough into eight equal pieces. I roll each piece into a ball, then press or gently roll them into thin, round discs on a lightly floured surface.
Step 3 — Cook on the stovetop
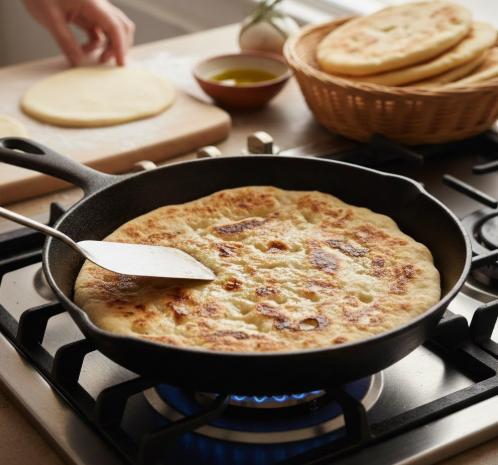
I heat a heavy skillet over medium heat and cook each flat round about 2 minutes per side. I look for light golden spots and a slightly puffed texture before flipping.
Step 4 — Serve and enjoy
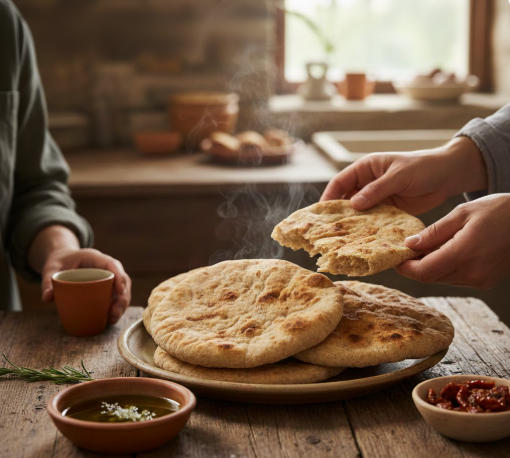
I serve the flatbreads warm, plain or with toppings. I store leftovers wrapped to keep them soft.
Tips
Tools I Use
- Large mixing bowl: gives space to combine ingredients without spills.
- A sturdy spoon or spatula: helps mix before kneading by hand.
- Heavy skillet or cast-iron pan: provides even heat for quick cooking.
- Optional: bamboo steamer if I want a softer, chewier finish.
- Tongs or a flat spatula: for flipping and removing bread safely.
What I Pick for Ingredients
- Flour: I usually start with whole wheat but swap to spelt, rye, or a mix for new flavors.
- Water: cold water keeps the dough firm and easy to handle.
- Salt: 1/2 to 1 teaspoon balances the dough; I adjust to taste.
- Oil: extra virgin olive oil adds flavor; I sometimes use coconut oil or vegan butter for variety.
- Sweet or savory add-ins: a tablespoon of honey or sugar for sweetness, or garlic and herbs for a savory loaf.
- Optional extras: chopped nuts, dried fruit, or seeds if I want texture and sweetness.
How I Follow the Steps
- Combine flour, water, salt, and oil in the bowl. Stir until it pulls together.
- Knead until smooth and elastic, about 5–8 minutes by hand.
- Rest the dough, covered, for at least 30 minutes to relax the gluten.
- Divide into 8 pieces, shape into balls, then flatten into rounds on a floured surface.
- Heat the skillet to medium, cook each flatbread about 2 minutes per side until light golden.
- For a softer result, I steam the rounds in a bamboo steamer for 2–4 minutes instead of pan-cooking.
- Toasting afterward makes the crust crisp if I want crunch.
Extra Notes I Rely On
- Flavor boosts: I add herbs or spices into the dough for more depth rather than topping only.
- Texture tips: steaming makes the bread tender; skillet cooking develops a toasty crust.
- Sweet options: mix in a spoonful of honey or fold in dried fruit and nuts for dessert-style bread.
- Savory options: fold in minced garlic, chopped onions, or fragrant herbs for a hearty roll.
- Substitutions: swap olive oil for coconut oil or vegan butter if needed; different flours change chew and taste.
- Serving ideas: spread jam or honey, or slice and make mini sandwiches with cheese, meats, and greens.
- Storage: keep cooled bread in an airtight container; reheat briefly in a skillet or toaster to refresh.
What I Serve with This Simple Biblical Bread
I like to pair this plain, unleavened bread with warm soups, hearty stews, or fresh salads. It soaks up broths and sauces well, so it works as a side or as a scoop for stews and dips.
- Savory options: hummus, tzatziki, olive tapenade, or a bean dip.
- Sweet options: honey, fruit jam, nut butter, or plain yogurt with fruit.
- Meal ideas: serve with grilled fish or roasted vegetables for a light dinner, or with lentil soup for a filling lunch.
Healthy notes: the bread adds fiber and simple nutrients without much sodium or cholesterol, so it fits well into balanced meals.
How I keep leftover Bread Jesus Ate fresh
I store slices in an airtight container or wrap them tightly in plastic to keep moisture out. I keep the bread in a cool, dry spot away from sunlight so it stays good for up to seven days.
For longer storage, I freeze pieces individually, each wrapped, or place several in a sealed container. To use, I thaw at room temperature for a few hours, then warm briefly in the oven or microwave. I prefer serving it at room temperature or slightly warmed for best texture and flavor.
Can I eat this while pregnant?
I can eat this bread during pregnancy, but I check with my doctor first if I have concerns. The simple ingredients—wheat flour and olive oil—are generally safe in moderation.
I control portion size to avoid extra calories and fat. Eating a small piece lets me enjoy the flavor and some nutrients without overdoing it. If I have gluten sensitivity or other dietary issues, I choose alternatives or follow my provider’s advice.
FAQs
Which flour should I use?
I usually choose wheat flour because it matches the traditional texture and taste. For a nuttier or denser loaf I swap in whole wheat, spelt, or rye. Oat flour works too but may make the dough softer and more fragile. If you mix flours, start with a 70/30 ratio (wheat to alternative) to keep structure.
Can I leave out the salt?
Yes. I sometimes omit salt for dietary reasons. Salt improves flavor and strengthens the dough, so when I skip it I add herbs, garlic powder, or a pinch of yeast for more taste. Expect a milder, less structured bread without salt.
Is this bread vegan-friendly?
Yes. I make this recipe without animal products. I use olive oil or another plant-based fat like coconut oil or vegan butter. If a recipe calls for dairy, I replace it with water or plant milk.
Wrapping Up
I enjoyed sharing this simple, earthy bread recipe and hope you try it at home. It feeds lightly, pairs well with many dishes, and connects you to old baking methods without needing fancy tools.
If you test the recipe, tell me what worked and what you changed. I answer questions and offer tips on storage, reheating, or small tweaks for flavor and texture.
Quick tips:
- Store wrapped in a cloth or airtight container for a few days.
- Freeze layers separated by parchment for longer keeping.
- Warm in a skillet or oven before serving.
If you want related recipes or guidance on ingredients, I can point you to easy variations and cooking notes.
FAQs
- What ingredients do I need to make the kind of bread Jesus likely ate?
I use simple ingredients: whole grain flour (often barley or wheat), water, a little salt, and sometimes olive oil. Many historical recipes were unleavened, so I skip yeast for that style. For a leavened version, I add a small amount of sourdough starter or yeast. - Is this bread safe to eat for people with modern food allergies or diets?
I recommend checking ingredients against allergies. Barley and wheat contain gluten, so this bread is unsafe for people with celiac disease. I can adapt the recipe using gluten-free flours, but the texture and taste will change. For low-salt or oil-free diets, I reduce or omit those elements. - How long does this bread stay fresh, and how should I store it?
I find it stays fresh 1–2 days at room temperature in a covered container. For longer storage, I freeze flat loaves for up to 2–3 months and thaw as needed. Reheat briefly in a warm oven or on a skillet to restore flexibility. - How do I keep the bread from becoming too hard or crumbly?
I avoid overbaking and keep the dough slightly moist before cooking. Cooking on a hot surface for a short time preserves pliability. If it becomes hard, I steam it briefly or wrap it in a damp towel and warm it to soften. - How does this ancient-style bread compare to modern sandwich bread?
I note several differences: ancient breads tend to be denser, simpler, and less sweet than modern loaves. They often lack commercial yeast and additives, so they taste earthier and have a chewier texture. Modern breads are softer and last longer due to added ingredients and processing. - Is this bread effective for religious or cultural use linked to biblical traditions?
I say it can serve symbolic or ceremonial roles because its ingredients and form match what historical sources describe. If you need a specific ritual type (for example, strictly unleavened for certain observances), follow the traditional ingredient and preparation rules. - What maintenance or care does the recipe require for consistent results?
I maintain consistent flour-to-water ratios and control cooking heat. For leavened versions, I keep starter or yeast active and feed a sourdough starter regularly. Clean cooking surfaces and proper storage help ensure repeatable outcomes.
Final Thoughts
I recommend trying a simple, authentic unleavened or barley flatbread recipe to connect with the flavors of ancient Israel. These breads use few, natural ingredients and require basic techniques, so they are safe and easy to make at home. I find them effective for daily meals, religious observance, or hands-on learning with kids.
- Practical: Most recipes need only flour, water, salt, and sometimes oil or barley, so ingredients are affordable and easy to source.
- Eco-friendly: Minimal processing and no special equipment lower energy use and waste.
- Suitable: Unleavened and barley breads work well for communal meals, teaching moments, or as a plain, wholesome accompaniment to soups and stews.
I advise choosing a clear, well-tested recipe and sticking to simple steps for the best results. With a reliable method, you get consistent texture and flavor while honoring tradition. Try one soon and keep a favorite version for future use.

