

Potato Cheese Sticks Recipe: Crispy, Easy Snack
I love snacks that blend a crisp exterior with gooey, melted cheese, and potato cheese sticks hit that mark every time. I’ll walk you through how to make these golden, cheesy bites at home, explain why the recipe works, and share simple tips to get a crunchy outside and a stretchy, melty center.
I’ll also cover easy swaps, a baking option, and storage ideas so you can make them any time. Expect clear steps, practical tips, and ways to serve them that keep the snack crowd-pleasing and simple.
Key Takeaways
- Potato cheese sticks pair a crispy shell with a soft, cheesy interior.
- The recipe focuses on a stable potato dough, a crunchy coating, and correct frying or baking.
- Simple swaps, storage tips, and serving ideas make this snack easy to customize.
What I call potato cheese sticks
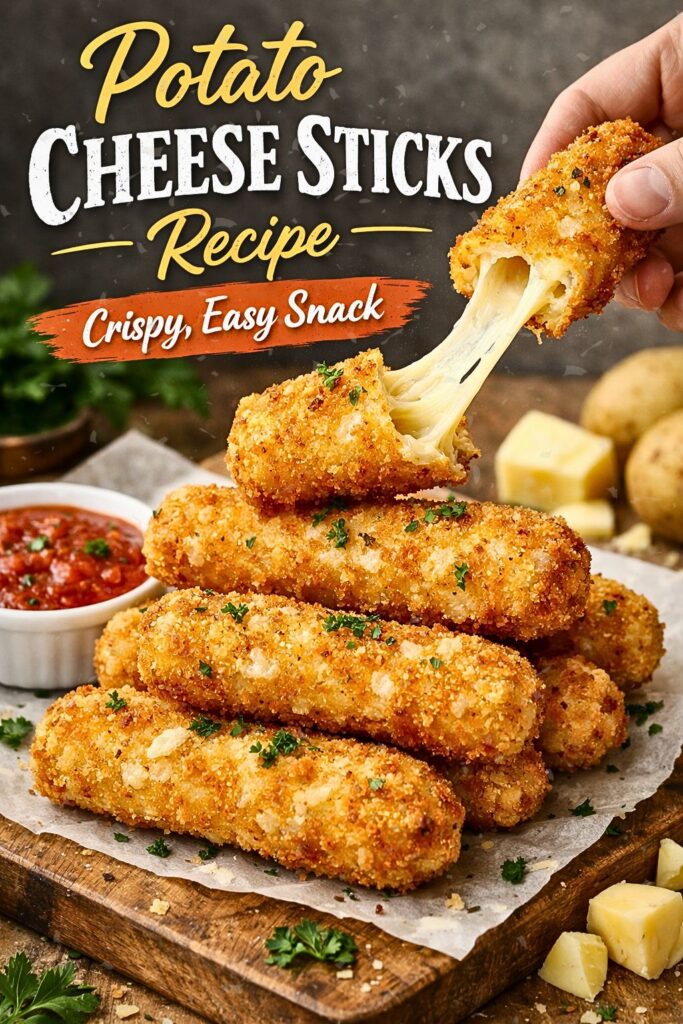
I shape seasoned mashed potato dough around stick-shaped cheddar, then roll them in panko breadcrumbs. I fry or bake the sticks until the outside is crisp and the cheese melts inside. They serve well as a snack or appetizer and pair nicely with dips like ketchup or spicy mayo.
Why this recipe works?
I rely on texture contrast to make these sticks satisfying. The mashed potato base stays soft and light, giving a tender bite around the filling. Melted cheddar inside creates a rich, gooey center that boosts flavor without overpowering the potato.
A crunchy panko crust locks in moisture and adds a crisp shell that balances the softness. Simple seasoning ties the elements together so each bite tastes cohesive and savory. This combo of soft, gooey, and crunchy keeps the snack addictive and easy to enjoy.
Potato Dough:
Seasoning — Salt and Pepper
I add salt and pepper to bring out the potato and cheese flavors. I taste as I go so the seasoning stays balanced, not overpowering.
Chopped Green Onions
I fold diced green onions into the dough for a mild onion bite and a splash of color. They brighten the mix without dominating the taste.
Sour Cream for Creaminess
I stir in sour cream to make the dough smooth and moist. It gives a tangy richness that helps bind the potatoes.
Russet Potatoes Base
I use mashed russets for a starchy, fluffy base. Their texture holds together well when shaped into sticks.
Crispy Bacon Bits
I mix crumbled bacon into the potatoes for a smoky, savory kick. The bacon adds crunch and depth.
Sharp Cheddar Filling
I tuck in sharp cheddar for a melty center. The cheese melts creamy and pairs well with the potatoes and bacon.
Coating:
Starch Layer
I use cornstarch to help the mix hold together and to give a light, crisp shell when fried.
Crunchy Crust
I choose panko crumbs for a flaky, extra-crispy texture that browns well whether I fry or bake.
Dry Dredge
I dust the sticks with all-purpose flour first so the next layer sticks evenly.
Wet Binder
I beat an egg and dip the sticks so the flour and breadcrumbs cling firmly.
Deep Frying:
Oils: Vegetable, Canola, or Peanut
I fry the potato sticks in a neutral oil heated to about 350°F (175°C).
I choose vegetable, canola, or peanut oil for steady heat and a crisp, golden crust.
I work in small batches, drain on paper towels, and serve hot for best texture.
How I make potato cheese sticks?
I mash cooked potatoes, form small cylinders, then press a cheddar strip inside.
I roll each stick in flour, dip in beaten egg, and coat with panko crumbs.
I deep-fry at 350°F (175°C) until golden, drain on paper towels, and serve hot.
Use a slotted spoon and be careful with oil.
Creating Potato Cheese Sticks:
Prep Work:
I start by getting all ingredients ready. I cook and cube russet potatoes, crisp and chop bacon, and slice green onions. I also measure sour cream, salt, and pepper so everything is within reach.
Step 1 — Combine the Mix
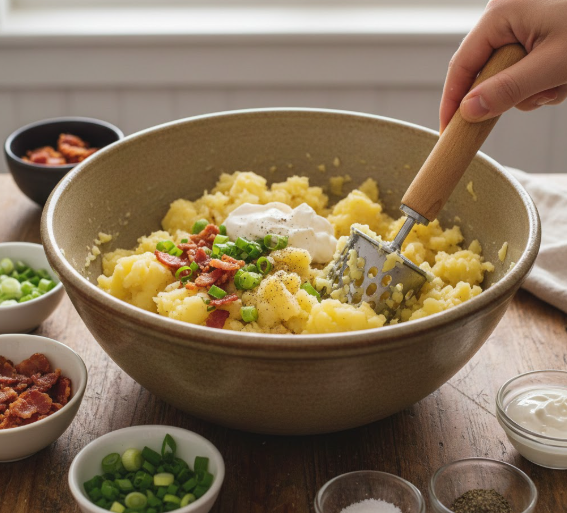
I put the warm potatoes, bacon, green onions, sour cream, and seasonings into a large bowl. I mash with a fork or potato masher until mostly smooth, leaving a few small lumps for texture. The mixture should hold together but stay soft.
Step 2 — Cut the Cheese
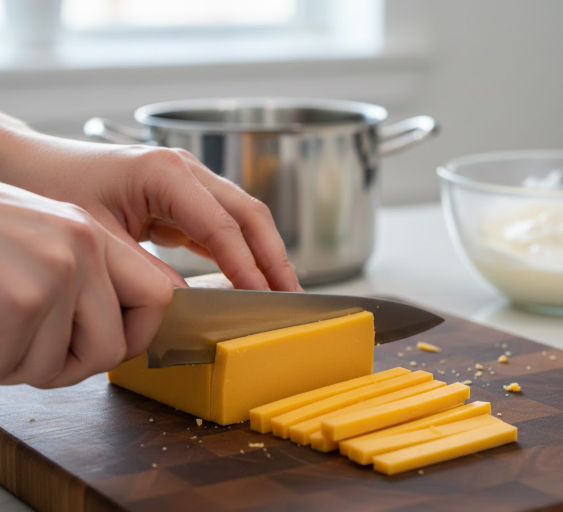
I slice a block of cheddar into thin sticks about 1/4 inch thick. Uniform pieces help the cheese melt evenly inside the potato.
Step 3 — Shape Around Cheese
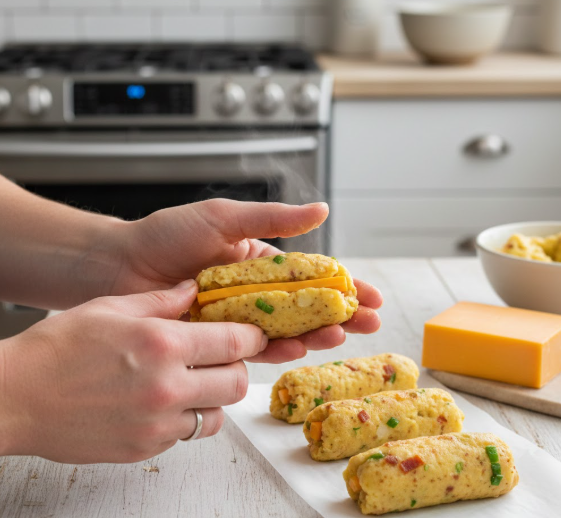
I flatten a spoonful of the potato blend in my palm, place a cheese stick in the center, and wrap the potato around it. I seal the edges so the cheese stays enclosed. I repeat until I use all the mixture.
Step 4 — Bread the Sticks
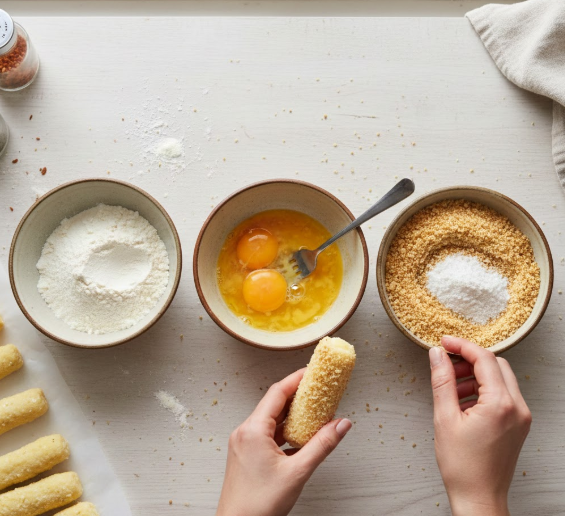
I set out three bowls: flour, beaten egg, and a mix of cornstarch plus panko. I roll each potato piece in flour, dip it in egg, then coat with the panko mix for a crispy finish.
Deep Frying
Step 1 — Heat the Oil

I pour enough neutral oil (vegetable or canola) into a deep pot so it covers at least 2 inches. I heat it to about 350°F (180°C) and watch the temperature so it stays steady.
Step 2 — Fry the Sticks

I lower the breaded potato sticks into the oil with tongs or a spider to avoid splashes. I cook them about 2–4 minutes, turning as needed, until they are golden and crisp on the outside.
Step 3 — Drain and Add Salt

I lift the sticks out with a slotted spoon and place them on paper towels to drain. While still hot, I sprinkle a little salt or seasonings to taste.
Baking Option
Step 1 — Heat the Oven

I set the oven to 400°F (200°C) so it reaches the right temperature before baking. A properly hot oven helps the exterior crisp without overcooking the filling.
Step 2 — Arrange and Cook
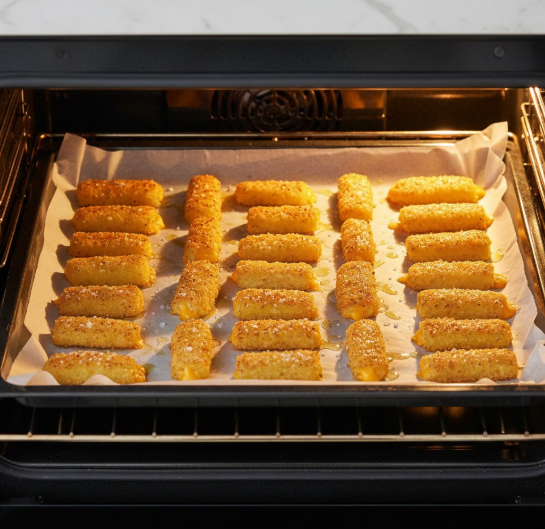
I place the coated potato sticks on parchment-lined baking sheets in a single layer. I drizzle a little olive oil, season with salt, and bake about 15 minutes until the outsides turn light golden and the cheese inside melts.
Step 3 — Rest and Plate

I let the sticks rest a few minutes after removing them so the filling firms and cools slightly. Then I transfer them to a plate and serve.
Tips:
- I chill the mashed potato mix so it firms up and is easier to shape.
- I rest the filled sticks in the fridge for about 30 minutes so they hold together while frying.
- I swap cheeses—mozzarella for stretch, pepper jack for heat—to change the taste.
- I double-coat with crumbs for a crunchier crust.
- I season the potato base differently each time to make new flavor combos.
Storing My Leftover Cheese Sticks
I keep leftovers in an airtight container in the fridge and use them within 2 days.
To re-crisp, I heat them in a 350°F oven for 10–15 minutes until warm and crunchy.
Tip: Place a paper towel under the sticks to absorb extra moisture.
Nutrition Information:
I list each serving’s key values below for quick reference.
- Calories: 65
- Carbohydrates: 7 g
- Fat: 3 g
- Protein: 1 g
- Sugar: 0 g
- Fiber: 0 g
How I’d Serve Potato Cheese Sticks
I like to place potato cheese sticks on a large platter with small bowls of dips — marinara, ranch, and spicy mayo work well. For a game day spread, I mix them with wings, sliders, and veggie sticks so everyone can grab what they want.
For parties, I arrange them in neat rows so they look easy to pick up, and label the dips. On family movie nights I serve them hot with extra napkins and a simple salad or fruit to balance the richness.
At brunch, I pair them with eggs, bacon, and fresh fruit for a salty, cheesy twist.
What I use instead when ingredients are missing
- Potato dough: I swap in mashed sweet potato or riced cauliflower for fewer carbs.
- Cheddar: I reach for Swiss, gouda, or provolone to change the taste.
- Panko: I crush cornflakes, pretzels, or crackers to get a crunchy crust.
- Sour cream: I use Greek yogurt or cream cheese for a tangy, creamy finish.
Potato Cheese Sticks Recipe
Tools I Use
- Large pot or deep fryer for frying, or a baking sheet for oven method.
- Mixing bowl, wooden spoon, and potato masher or fork.
- Measuring cups and spoons, spatula, slotted spoon, and tongs.
- Strainer, plates lined with paper towels, and parchment paper if baking.
What Goes In
- 3 russet potatoes, cooked and cubed
- 1 block sharp cheddar, cut into 1/4-inch strips
- 1/4 cup diced bacon (optional)
- 1/4 cup diced green onion
- 1/2 cup sour cream
- 1 teaspoon salt and 1/2 teaspoon black pepper
- 2/3 cup cornstarch
- 100 g panko breadcrumbs
- All-purpose flour (for dredging)
- 1 large egg, beaten
- 1 liter vegetable or canola oil for frying (or a light brush of olive oil for baking)
Step-by-Step Method
- In a large bowl, mix the cooked potatoes, sour cream, bacon, green onions, salt, and pepper. Mash with a potato masher or fork until mostly smooth but still slightly textured.
- Slice the cheddar into thin sticks about 1/4 inch thick.
- Take a spoonful of the potato mix, flatten it in your palm, place a cheese stick in the center, and wrap the potato around the cheese to form a sealed ball or a stick shape. Repeat until the mixture is used.
- Set up a three-step coating station: a shallow dish of flour, a bowl with the beaten egg, and a bowl with cornstarch mixed into the panko.
- Dredge each potato-wrapped cheese piece in flour, dip in egg, then press into the cornstarch-panko mix so it’s fully coated. For extra crunch, repeat the egg and panko step.
- For frying: heat oil in a deep pot or fryer to 350°F (180°C) with at least 2 inches of oil. Fry batches carefully for about 3 minutes or until golden brown. Drain on paper towels and season lightly with salt while hot.
- For baking: preheat oven to 400°F (200°C). Place coated sticks on a parchment-lined sheet, brush or spray lightly with oil, and bake about 15 minutes or until the outside is light golden and cheese is melted.
- Let sticks rest a few minutes before serving so the cheese settles. Serve warm.
Tips and Variations
- Chill the shaped sticks in the fridge for 20–30 minutes before coating to help them hold shape.
- Use mozzarella or pepper jack instead of cheddar for a milder or spicier pull.
- Double-coat with egg and panko for a thicker, crunchier crust.
- Add spices (garlic powder, smoked paprika, or chili flakes) into the potato mix for extra flavor.
- If you want less oil, bake and turn halfway through for even browning.
Estimated Nutrition
- Serving size: one small stick (approximate)
- Calories: about 65 kcal per stick (depends on cheese type, oil absorbed, and portion size)
- Fat, carbs, and protein will vary with ingredients and cooking method. Adjust portions and use lower-fat cheese or less oil to reduce calories.
Frequently Asked Questions:
- Can I bake them instead of frying?
I bake them when I want less oil. I set the oven to 400°F (205°C) and bake on a greased sheet for about 20–25 minutes, turning once so both sides brown evenly. The crust will be firmer with frying, but baking still yields a tasty, lighter stick. - Can I freeze the sticks before cooking?
I freeze unbaked sticks on a tray until solid, then move them to a labeled freezer bag. They keep well for up to three months. To cook, I thaw them in the fridge overnight and then fry or bake as usual. - Will an air fryer work?
Yes. I preheat the air fryer to 375°F (190°C), lightly spray the sticks with oil, and cook in small batches for 10–12 minutes. I shake or flip them halfway for even browning. - Can I use store-bought mashed potatoes?
I sometimes use pre-made mashed potatoes for speed. Fresh, homemade mashed potatoes give better texture and hold together more reliably, but good-quality store-bought ones will still work. - Can I change the fillings?
I like to vary fillings. Options that work well include cooked ground beef, diced ham, sautéed mushrooms, chopped green onions, or jalapeños for heat. Mix fillings into the potato or add a cheese center for extra melt. - How do I make them vegetarian?
I remove any bacon or meat and choose vegetarian cheeses. You can add vegetables or plant-based proteins for flavor and texture without changing the basic method.
Closing Thoughts
I love how simple ingredients turn into a crowd-pleasing snack with great texture and flavor. The crunchy outside and melted cheese inside make these sticks easy to enjoy at parties, game nights, or quiet evenings at home.
Try small tweaks—swap cheeses, add herbs, or bake instead of fry—to match your taste and keep the recipe fresh. I find that small changes let you control richness, salt, and crispness without losing the core idea.
- Prep tip: chill the shaped sticks before cooking to keep them from falling apart.
- Serving idea: pair with a tangy dip or a spicy sauce to balance the richness.
I encourage you to experiment and make the recipe your own. Keep notes on what works so you can repeat it. Make a batch, share with friends, and watch which version becomes the favorite.
FAQs
Q: What makes my potato cheese sticks stay crispy after frying?
I use starchy potatoes and remove excess moisture from the mashed base. Chilling the shaped sticks before frying firms them up. Frying at the right oil temperature (around 350–375°F / 175–190°C) seals the crust quickly and keeps them crisp.
Q: Are potato cheese sticks safe to eat for kids and adults?
Yes, when cooked through they are safe. I ensure the oil is hot enough to cook the interior without burning the outside. For children or those with dietary limits, I use pasteurized cheeses and cook until steaming hot. Watch for choking hazards with very hot or large pieces.
Q: How long can I store prepared sticks before frying?
You can shape them and refrigerate for up to 24 hours in an airtight container. I do not freeze them raw, because thawing can make them soggy. For longer storage, freeze fully cooked sticks on a tray, then transfer to a freezer bag for up to 1 month.
Q: How do potato cheese sticks compare to other snack options like mozzarella sticks or fries?
Potato cheese sticks combine a soft, seasoned potato interior with melted cheese. Compared to mozzarella sticks, they have more potato flavor and a firmer bite. Versus fries, they are richer and more filling because of the cheese and binder ingredients. I choose based on desired texture and flavor.
Q: What maintenance or care do I need for the oil when frying these?
I filter the oil after it cools and store it in a sealed container if I plan to reuse it. Avoid overheating oil to prevent breakdown. Replace oil when it smells off, foams, or darkens significantly.
Q: Can I make a baked version, and how does it change the result?
Yes, I bake them at about 425°F (220°C) sprayed with oil. Baking reduces oil use and makes them less greasy, but they will be less crispy than deep-fried. A light breadcrumb coating and turning halfway helps improve browning.
Q: What seasonings and cheeses work best?
I use sharp cheddar for strong flavor and mozzarella for stretch. Season with salt, pepper, garlic powder, and a pinch of paprika for color. Fresh herbs or grated Parmesan add a savory boost. Adjust amounts to taste.
Q: How do I stop the cheese from leaking during frying?
I freeze the assembled sticks briefly before frying so the cheese firms up. I seal edges well with a tight coating of potato mixture and breadcrumbs. Frying at the correct temperature also helps form a quick crust that keeps cheese inside.
Conclusion
I find potato cheese sticks an easy, satisfying snack that works for many occasions. They pair creamy mashed potato with melted cheese and a crisp coating, giving a mix of soft and crunchy textures that people enjoy.
I recommend using fresh ingredients and a reliable frying method or oven-bake for consistent results. Choosing good potatoes, quality cheese, and proper seasoning makes the flavor better. For safety, I follow proper frying temperatures and drain the sticks well to reduce excess oil.
These sticks can be made to fit different needs: bake or air-fry for a lighter option, use gluten-free crumbs if needed, or freeze prepped sticks for quick cooking later. That makes them practical and eco-friendly when you plan batches and avoid waste.
I encourage trying a trusted recipe and adapting it to your taste. With simple steps and a few tweaks, you can make a dependable, tasty snack that’s great for family meals, parties, or quick bites.


