

Bear Jam Recipe: Simple Wild Berry Preserve Guide
I love turning a pile of ripe berries into a thick, tasty jam that brightens toast, pastries, and desserts. Making bear jam uses fresh or frozen berries and keeps the true fruit flavor, so you can enjoy summer taste all year long.
I’ll show simple steps for preparing berries, cooking, and storing jars so you can make a reliable batch at home. The method preserves the berries’ natural sweetness and creates a spread that works for breakfast, snacks, and homemade gifts.
Key Takeaways
- Jam captures seasonal berry flavor for year-round use.
- The recipe uses easy steps for prep, cooking, and jar storage.
- Finished jam works well on toast, pastries, and desserts.
What is Bear Jam?
I make bear jam from fresh or frozen wild berries. It’s a thick, sweet spread I use on toast, muffins, and pastries.
- Main ingredients: mixed wild berries, sugar, and lemon juice.
- Purpose: capture seasonal fruit flavor and store berries for winter.
Why I Love This Wild Berry Spread
I make this jam because it’s quick and uses whatever berries I have on hand. It freezes or jars well, so I keep summer fruit through the colder months.
- Versatile uses: I spoon it on toast, into pastries, or over ice cream.
- Simple process: No special tools or skills needed.
- Balanced flavor: The mix of berries gives a bright, not-too-sweet taste.
Tip: Make extra—this keeps well and makes easy gifts for friends.
The Ingredients
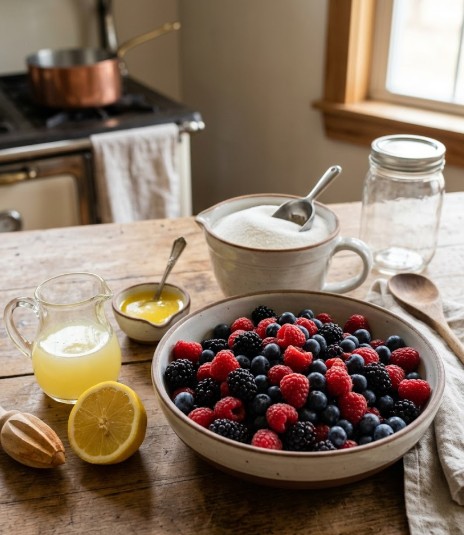
I gather about eight handfuls of mixed berries, fresh or frozen—raspberries, blackberries, or blueberries work well. The fruit gives the jam its flavor, natural pectin, and color.
I keep 4 cups of granulated sugar on hand to sweeten the mixture and help it set. Sugar also extends the jam’s shelf life by acting as a preservative.
I add 1/2 cup of freshly squeezed lemon juice to provide acidity. The lemon helps the pectin gel and sharpens the berry flavors so the jam isn’t overly sweet.
Optionally, I use 1/2 teaspoon of clarified butter during cooking to reduce surface foam. A small dab can make the final jam clearer and cut down on messy skimming.
- Berries: 8 handfuls (fresh or frozen)
- Sugar: 4 cups (organic if preferred)
- Lemon juice: 1/2 cup, freshly squeezed
- Clarified butter: 1/2 tsp (optional)
Step 1: Prepare the Berries
I wash fresh berries under cold running water and pat them dry.
If I use frozen berries, I let them thaw at room temperature or warm them gently in a pot until soft.
Step 2: Sterilize Jars
I wash jars and lids in hot, soapy water, then rinse well.
I dry them slightly and place them in a 250°F (121°C) oven for about 15 minutes.
I keep jars warm until I fill them to prevent contamination.
Step 3: Cooking the Berries
I transfer the prepared berries into a large, heavy-bottomed pot. Using a potato masher or a sturdy spoon, I gently crush the fruit to release its natural juices while leaving some larger chunks for texture. I then place the pot over medium heat, stirring occasionally, until the berries soften further and the mixture begins to simmer.
Step 4: Add Sugar and Lemon Juice (My Mix-in)
I sprinkle the measured sugar and fresh lemon juice over the crushed berries. I stir until the sugar starts to dissolve and the mixture looks evenly moistened.
Step 5: Heat and Melt the Sugar
I set the pot on medium-high heat and stir constantly so the sugar melts into the fruit. If foam forms, I may add a small amount of clarified butter to cut down on bubbles.
Step 6: Raise to a Rolling Boil
I turn the heat up until the jam reaches a full, rolling boil. I keep stirring often so the fruit won’t scorch on the bottom.
Step 7: Check for Setting Point
I use a candy thermometer and watch for about 220°F (105°C). If I don’t use a thermometer, I drop a bit of hot jam on a chilled plate; if it thickens and wrinkles when I push it, it’s set.
Step 8: Shut Off and Skim
Once the jam hits the gel stage, I remove the pot from the heat. I skim any foam off the surface so the jars look clear and the texture stays smooth.
Step 9: Spoon Into Jars
I ladle the hot jam into clean, warmed jars, leaving roughly 1/4 inch of headspace. I wipe the rims with a damp cloth to remove any spillover before closing.
Step 10: Close and Store Properly
I seal jars with lids and let them cool undisturbed until I hear the lids pop. I store sealed jars in a cool, dark place; after opening, I keep them refrigerated.
Step 11: Serve and Enjoy
I spread the finished jam on toast, pancakes, or use it as a topping for desserts. It’s ready to eat once cooled and sealed.
Notes
I recommend choosing the ripest, highest-quality berries you can find; they make the biggest difference in taste. I use fresh berries when possible, but frozen work well and save time. For a warmer spice profile, I sometimes add a pinch of cinnamon, nutmeg, or ground ginger. To thicken, I stir in 1 tablespoon of cornstarch before I simmer. I keep finished jam in an airtight container in the fridge for up to two weeks.
Nutrition Information

I made about 1½ cups of jam.
Per tablespoon serving: 65 calories, 0 g fat, 7 g carbs, 0 g protein.
I recommend storing and using modest portions for balanced intake.
How I Keep My Bear Jam Fresh
I store jam in clean, airtight jars. I refrigerate opened jars and use them within two weeks. For longer storage, I freeze portions in sealed containers for up to three months.
My Twist Ideas

I like adding a tablespoon of fresh or ground ginger for a warm, spicy note.
Sometimes I swap vanilla for a teaspoon of almond extract to bring a mild nutty taste.
I stir in a tablespoon of honey when I want more sweetness.
I often use frozen fruits like peaches, mangoes, or strawberries to change the flavor.
For extra nutrition, I fold in a tablespoon of chia or ground flaxseed.
Bear Jam Recipe
Ingredients I Use
- 4 cups granulated sugar (organic if possible)
- 8 generous handfuls mixed berries — raspberries, blackberries, and/or blueberries (fresh or frozen)
- 1/2 cup fresh lemon juice, strained
- 1/2 teaspoon clarified butter (optional, to cut foaming)
- Equipment: heavy-bottomed pot, potato masher or fork, candy thermometer (or chilled plate), sterilized jars and lids
Step-by-Step Method
- If using fresh berries, I rinse them and drain well. If frozen, I let them thaw or warm gently until soft.
- I mash the berries in a large pot with a potato masher or fork to release their juices.
- I add the sugar and lemon juice to the fruit and stir until the sugar begins to dissolve.
- I heat the mixture over medium-high, stirring constantly so the sugar fully dissolves. I add the clarified butter now if I want less foam.
- I turn the heat up to bring the pot to a steady, rolling boil and stir frequently to avoid scorching.
- I watch the temperature with a candy thermometer and aim for about 220°F (105°C). If I don’t use a thermometer, I do the chilled plate gel test: a spoonful on a cold plate should wrinkle when pushed after cooling a few seconds.
- When the jam reaches gel stage, I remove the pot from heat and skim off any foam.
- I ladle the hot jam into warm, sterilized jars, leaving roughly 1/4 inch headspace. I wipe the rims clean and seal with lids.
- I let jars cool at room temperature until lids pop and seal. I store sealed jars in a cool, dark place. Once opened, I keep jars refrigerated.
Helpful Tips and Variations
- Use the ripest berries you can find for the best flavor.
- Fresh or frozen berries both work; frozen may need extra thaw time.
- For a spiced twist, I add a pinch of cinnamon, nutmeg, or ground ginger while cooking.
- To thicken faster, I might stir in 1 tablespoon cornstarch mixed with a little cold water before boiling.
- If foam forms, skim it off for clearer jars. The clarified butter helps reduce foam but is optional.
- Properly sterilize jars and lids by washing in hot soapy water, rinsing, then warming in a 250°F oven for about 15 minutes.
Estimated Nutrition and Yield
- Servings: about 8 half-cup servings
- Calories per serving: ~65 kcal
- Storage: unopened jars keep in a cool, dark place; refrigerated after opening for up to two weeks.
Bold note: I always test a small chilled plate sample to be sure the jam has set before removing from heat.
Frequently Asked Questions
- How long will my bear jam stay good?
I keep homemade bear jam in the fridge for up to two weeks in a sealed jar. For longer storage, I freeze portions and use them within three months. - Is this jam a healthy choice?
I consider it healthy when made with just berries and minimal sweetener. It has no commercial preservatives or artificial additives if I stick to simple ingredients. - Can I use frozen berries instead of fresh?
Yes. I often use frozen berries; they thaw and break down well during cooking and give the same flavor and texture as fresh berries. - Is the recipe difficult?
I find it simple. Combine the berries and other ingredients in a pan, simmer until thickened, then jar it. No special skills are needed. - What are practical uses for bear jam?
I spread it on toast, use it as a pastry filling, spoon it over ice cream, or stir it into yogurt. - May I flavor the jam with extras?
I like adding spices or sweeteners—cinnamon, nutmeg, ginger, or a bit of honey all work well to change the taste. - Can I freeze the jam safely?
Yes. I freeze jam in airtight containers or freezer bags and label them with the date. I use frozen jam within about three months for best quality.
Closing Thoughts
I enjoy how simple, seasonal fruit can turn into something versatile and tasty. Making this jam lets me use fresh or frozen berries and tweak the spice level with cinnamon, nutmeg, or ginger. I often spread it on toast or croissants, spoon it over ice cream, or mix a little into yogurt for a quick treat.
I store jars in the fridge for up to two weeks when I plan to eat them soon. For longer keeping, I freeze portions and pull them out as needed; frozen jam holds well for about three months. Using airtight containers and clean jars helps the jam stay fresh and keeps flavors bright.
If you like experimenting, try varying the berry mix or adjusting sugar and spice to match your taste. Small changes can make a big difference in texture and tang. I find that making jam in small batches keeps it fun and reduces waste.
FAQs
- What makes my bear jam different from regular berry jam?
I blend a mix of wild berries—usually blackberries, blueberries, and raspberries—for a bolder, fruit-forward flavor. I often add honey or a small amount of sugar to balance tartness and use lemon juice for brightness and safe preservation. The result is thicker, more textured, and richer than plain single-berry jams. - Is it safe to use wild berries for this recipe?
Yes, if I positively identify the berries and wash them well. I avoid any berry I’m unsure about and remove stems, leaves, or damaged fruit. Cooking the berries also kills most microbes, and adding the proper acid (lemon juice) and reaching a full boil helps preserve the jam safely. - How long will my bear jam keep, and how should I store it?
I store opened jars in the refrigerator and use them within 3–4 weeks. Unopened, properly canned jars keep in a cool, dark place for up to a year. For the best taste, I label jars with the date and use the oldest ones first. - Do I need special equipment or skills?
No special skills are required. I use basic kitchen tools: a heavy pot, a ladle, jars with lids, and a spoon or potato masher. If I want long-term shelf storage, I use a water-bath canner or follow a reliable boiling-water canning method to seal jars safely. - Can I reduce sugar or replace it with honey or pectin?
I can lower sugar, but it changes texture and shelf life. Honey works as a sweetener and adds flavor, but I adjust quantities since it is sweeter by volume. Adding commercial pectin helps the jam set with less sugar. If I reduce sugar, I keep jars refrigerated and use them sooner. - How do I keep seeds and skins from making the jam gritty?
I strain cooked fruit through a coarse sieve or run it briefly in a blender before cooking to smooth the texture. For fewer seeds, I mash and cook, then push the mixture through a sieve while it’s warm. Adjusting cooking time can also change thickness without extra seeds. - How does bear jam compare to other preserves like jelly or marmalade?
I find bear jam is chunkier and fruitier than jelly, which is clear and firm because it uses only juice. Marmalade uses citrus peel and has a distinct bitter-sweet taste. Bear jam keeps more fruit texture and a bolder berry flavor than either option.
Final Thoughts
I recommend making bear jam with ripe, high-quality berries and a reliable recipe to get consistent, tasty results. I find that balancing fruit, sugar, and lemon juice keeps the flavor bright while helping the jam set without overcooking. Using pectin or a tried-and-true cooking method improves texture and shelf life.
- Effectiveness: This jam method delivers bold, concentrated berry flavor that spreads well and holds up as a topping or gift.
- Safety: I always follow proper canning steps — sterilize jars, use correct processing times, and store sealed jars in a cool, dark place to prevent spoilage.
- Eco-friendliness: Choosing local or foraged berries and reusable jars lowers waste and supports sustainable habits.
- Suitability: The recipe suits beginners and experienced cooks; you can adapt sugar levels, berry mixes, or add spices to match taste or dietary needs.
I encourage you to pick a trusted recipe, follow safe canning practices, and experiment with berry combinations. Try one jar this week and you may find it becomes a pantry favorite.
