

Pappasitos Queso Recipe
Pappasito’s queso ranks among my favorite Tex‑Mex dips for its smooth, cheesy texture and balanced heat. I’ll walk you through a simple home recipe that copies the flavors you love, using easy ingredients and clear steps so you can make a crowd‑pleasing dip without a restaurant kitchen.
I’ll also point out helpful tips, storage ideas, and a few tasty variations to suit your spice level or pantry. Follow along and you’ll have warm, melty queso ready for chips, tacos, or anything that needs a cheesy boost.

Key Takeaways
- Learn a straightforward method to recreate a creamy, spicy queso at home.
- Find practical tips for ingredients, storage, and simple variations.
- Get clear, step‑by‑step guidance to make the dip reliably every time.
What I Mean by Pappasito’s Queso
I describe Pappasito’s queso as a rich, creamy cheese dip common in Tex‑Mex cooking. I make it from a smooth blend of processed American cheese, milk, and sautéed onions and garlic, with roasted green chiles and diced tomatoes for flavor. I use it for dipping tortilla chips or spooning over tacos and enchiladas. I find the mix of creamy texture, mild heat, and fresh tomato brightness keeps people coming back for more.
Why I Love Making This Pappasito’s Queso
I can whip this queso up with a few pantry staples and simple tools, so it’s quick when I need a crowd-pleasing snack.
I control the heat by adding more or fewer green chiles or jalapeño, so I make it mild for kids or spicier for adults.
The texture stays smooth and pourable, which makes it great for dipping chips or spooning over tacos and nachos.
Because the recipe yields a big batch, I often bring it to parties or family gatherings — it feeds a group without extra fuss.
I also like that the flavors are flexible: I can add roasted peppers, a squeeze of lime, or extra garlic to suit the meal.
Kids in my house always eat it first, and adults keep coming back for more.
- Easy to scale up or down
- Adjustable spice and mix-ins
- Works as dip or topping
- Makes plenty for sharing
The Ingredients
I use creamy American cheese as the base to get a smooth, melty texture. I pick a good-quality brand for better taste.
For heat and texture, I add roasted green chilies. They give mild spice and small chunks that mix well with the cheese.
I stir in whole milk to reach the right thickness; 2% works if needed, but I avoid skim milk because it thins the dip too much.
I flavor the queso with minced garlic and a touch of garlic salt for that classic savory note.
Diced onion brings depth and a mild bite. Ripe diced tomatoes add freshness and a bright contrast to the rich, cheesy base.
Step by Step Instructions
Step 1 — Get everything ready
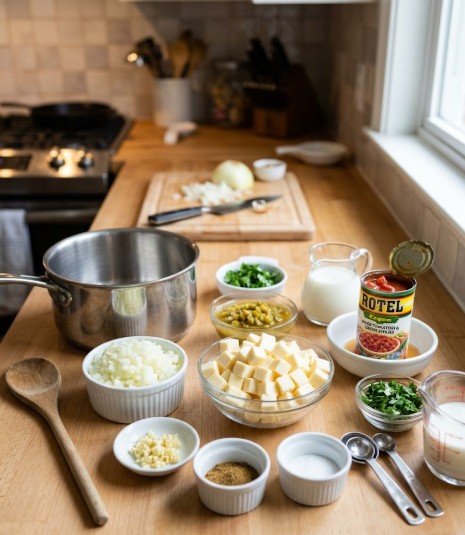
I measure and arrange all ingredients before I start.
Having items prepped saves time and prevents mistakes during cooking.
Step 2 — Cut the cheeses

I cube the American cheese into small pieces so it melts smoothly.
Smaller pieces help the cheese blend evenly into the sauce.
Step 3 — Cook the aromatics

I sauté diced onion and minced garlic in a saucepan until they turn translucent.
I watch closely so they soften without browning, which keeps the flavor mild.
Step 4 — Add chiles and tomatoes

I stir in canned green chiles with their juices and the diced tomatoes.
Mixing them now builds the base flavor and adds moisture for melting.
Step 5 — Combine cheese and milk
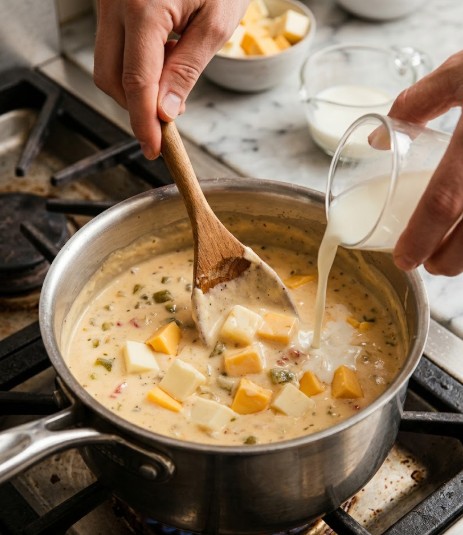
I add the cheese cubes slowly, stirring constantly to avoid lumps.
Then I pour in milk little by little, stirring until the texture reaches what I want.
Step 6 — Finish and plate

I keep the mixture on low heat, stirring occasionally until fully smooth and hot.
When it’s ready, I remove it from heat and transfer it to a serving bowl.
Notes
- I use full‑fat American cheese for best melt and flavor.
- I increase roasted green chiles and garlic when I want more heat.
- I avoid skim milk because it thins the dip and changes texture.
How I Keep Leftover Pappasito’s Queso Fresh
I store leftover queso in an airtight container and chill it in the fridge for up to three days. I cool it to room temperature first, then seal it to keep out air and odors.
To reheat, I warm the portion in a small saucepan over low heat, stirring often until smooth and hot. If the queso thickens, I add a splash of milk to loosen it.
For longer storage, I freeze queso in a freezer-safe container for up to three months. I thaw it in the fridge overnight and reheat the same way, knowing the texture may change slightly.
Variations
I like to mix cooked ground beef into the queso for a meaty twist.
I sometimes swap cheeses — pepper jack or sharp cheddar add new flavors.
For silkier texture, I replace some milk with half-and-half or heavy cream.
Pappasito’s Queso Recipe
Ingredients I Use
- 3 lb American cheese, cut into small cubes
- 10 oz canned green chiles, including the juice
- 2/3 cup whole milk
- 6 tsp minced garlic
- 1 cup onion, finely diced
- 1/2 tsp garlic salt
- 1 cup ripe tomato, diced
How I Make It
- Measure and prep everything before you start to keep the process smooth.
- Heat a large saucepan over medium heat. Sauté the diced onion and minced garlic until they turn translucent but do not brown.
- Add the canned green chiles with their juice and the diced tomatoes. Stir to combine.
- Lower the heat to medium-low. Add the cubed American cheese a handful at a time, stirring constantly so it melts evenly.
- Pour in the milk slowly while stirring, until the dip reaches your preferred smoothness.
- Reduce to low and simmer briefly, stirring occasionally, until fully combined and heated through. Transfer to a warm serving bowl.
Tips and Variations
- Use good-quality American cheese for the creamiest texture.
- For more heat, add extra green chiles or a diced jalapeño.
- Avoid skim milk; it can make the dip grainy.
- If the queso gets too thick, stir in small splashes of milk until it loosens.
- I like to keep the dip warm in a small slow cooker for parties.
Estimated Nutrition
- Serving size: about 12 servings
- Calories per serving: ~376 kcal
Nutrition values are estimates and can change based on exact brands and portion sizes.
FAQs
- Can I heat the queso in the microwave?
Yes. I heat the cheese and mix the ingredients in a microwave-safe bowl. I microwave in 30-second bursts, stirring after each burst until the dip is smooth and fully blended. - Can I swap fresh tomatoes for canned?
I can. I use 1–2 diced fresh tomatoes as a substitute. I remove the seeds so the queso doesn’t get watery. - Is this queso safe for a gluten-free diet?
It is, when I serve it with certified gluten-free chips. The dip itself contains no gluten ingredients.
Final Thoughts
I hope this version of Pappasito’s queso becomes a go-to for your gatherings and quiet nights at home. It warms up fast, keeps well in the fridge, and makes a simple snack feel special. I like to prep parts ahead — chop the onions and peppers, measure spices — so the final melt is quick and stress-free.
Tips I find useful:
- Reheat gently over low heat or in short bursts in the microwave to keep the texture smooth.
- Press plastic wrap onto the surface before sealing to help prevent a skin from forming.
- Serve with warm chips and small bowls of extra toppings like pico, jalapeños, or cilantro.
If you try this recipe, tell friends or family who’d enjoy it. I include related recipes I often pair with queso when I plan a menu. Experiment with mild or spicy chiles to match your taste, and adjust the cheese blend until it feels just right for you.
FAQs
- Q: Can I make this queso ahead of time and still keep it creamy?
- A: Yes. I usually make the queso up to 2–3 days before serving. Cool it, store it in an airtight container in the fridge, and gently reheat over low heat with a splash of milk or cream to restore smoothness.
- Q: Is this queso safe for people with mild lactose intolerance?
- A: It depends on the person. I recommend using smaller amounts and testing a bite first. You can also swap in lactose-free milk and reduced-lactose cheeses to lower discomfort while keeping good flavor.
- Q: How long will the queso stay good once served?
- A: At room temperature, I don’t leave queso out for more than two hours. If the room is warm, cut that to one hour. After that, move leftovers to the fridge and reheat before eating.
- Q: What’s the best way to keep the texture smooth when reheating?
- A: I reheat slowly over low heat, stirring often. Adding a little milk, cream, or even a spoonful of salsa verde helps the cheeses loosen up and prevents graininess.
- Q: How can I make the heat level right for a crowd?
- A: I control spice by adding jalapeños, green chiles, or cayenne a bit at a time. Keep some chopped fresh jalapeños or hot sauce on the side so guests can adjust their own bowls.
- Q: How does this restaurant-style queso compare with simpler melted-cheese dips?
- A: I find the restaurant-style version uses a blend of sharp and mild melting cheeses and includes chiles, onion, and tomato for depth. Simpler dips might melt faster but lack the layered flavors and smooth mouthfeel of the Tex‑Mex version.
- Q: What maintenance does the dip need during a party to stay appealing?
- A: I keep queso in a warm slow cooker or on a low chafing dish. Stir every 15–20 minutes and add small amounts of liquid if it starts to thicken. Cover between servings to avoid a skin forming.
Closing Thoughts
I found that a homemade Pappasito’s-style queso brings big flavor with simple steps. It melts smoothly when you use a blend of mild, melty cheeses and gentle heat from roasted green chiles and diced tomatoes. Fresh onion and a touch of garlic lift the taste without making the recipe hard to follow.
I recommend using good-quality cheese and low-moisture options to avoid a grainy dip. Stir gently and keep the heat moderate so the texture stays creamy. If you want a milder, more eco-friendly choice, pick cheeses from local producers or brands that use sustainable practices.
I trust this version as a safe, family-friendly appetizer that fits many diets with small tweaks. Try it at your next gathering and pick a reliable recipe you can repeat often for consistent results.