Dash My Mug Protein Ice Cream Recipe
I love ice cream, but I also want snacks that fit my goals. I wanted a cool, creamy treat that felt a little healthier, so I tested a simple method with my Dash My Mug machine and found a fast, satisfying protein ice cream that doesn’t need fancy skills or long prep.
This recipe makes single-serve ice cream that’s easy to mix, quick to chill, and higher in protein than usual desserts. I’ll show the basic steps, useful tips, and how to store and serve it so you can enjoy a guilt-reduced treat anytime.
Key Takeaways
- The recipe delivers a quick, single-serve protein ice cream that’s simple to make.
- You only need a few basic ingredients and a small ice cream maker or similar tool.
- Tips on prep, storage, and serving keep the treat tasty and convenient.
What Does Dash My Mug Protein Ice Cream Taste Like?
I found it creamier than I expected, with none of the chalky aftertaste I’ve had from other protein treats.
It feels like a cross between soft-serve and a chilled protein shake — smooth, lightly sweet, and easy to eat.
Mix-ins show up well. Chocolate chips add bursts of cocoa, peanut butter gives a nutty richness, and banana slices bring a fresh, fruity note.
You can tweak sweetness and texture by changing the milk, yogurt, or protein powder.
I can make it feel more indulgent or more like a health snack depending on the additions I choose.
Key Ingredients in Dash My Mug Protein Ice Cream
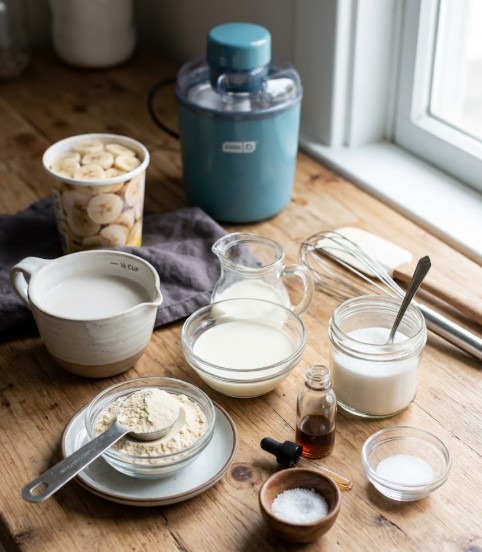
I use a short list of simple ingredients that make this single-serve ice cream rich, creamy, and higher in protein. Below I break down each item, why it matters, and easy swaps if you need them.
- Unsweetened almond milk — 1/2 cup
I choose unsweetened almond milk as the light base. It keeps the mixture thin enough to spin in the Dash My Mug and avoids added sugars. Swap options: regular milk, soy, or oat milk; just pick unsweetened versions to control sweetness. - Heavy cream — 1/4 cup
Heavy cream gives the mix body and that soft-serve texture. It’s the main reason the ice cream feels rich. For a dairy-free version, I use coconut cream, which adds creaminess and a faint coconut note. - Vanilla protein powder — 1 scoop (≈30 g)
Protein powder adds the protein boost and helps thicken the mix. I prefer whey for a smooth taste, but plant-based powders work too. Choose a mild-flavored powder so it doesn’t mask the vanilla. - Granulated sugar — 2 tablespoons
I add just enough sugar to round out flavors. If you prefer liquid sweeteners, like honey or maple syrup, reduce almond milk by about 1 tablespoon so the mix stays thicker. Sugar-free sweeteners (erythritol, stevia) are fine if you want fewer calories. - Vanilla extract — 1/2 teaspoon
A small amount of vanilla extract lifts the overall flavor and complements the protein powder. If you don’t have vanilla, a tiny pinch of cinnamon works as a different but pleasant twist. - Pinch of salt
I always add a pinch of salt to make the flavors more distinct. It’s optional, but it balances sweetness and brings out the creaminess.
Quick tips:
- Adjust sweetness to taste before churning.
- Use slightly less liquid for thicker results.
- Freeze the Dash My Mug bowl fully for best texture.
Tools I Use in the Kitchen

- Dash My Mug ice cream maker
- Liquid measuring cup and measuring spoons
- Small bowl plus whisk or spoon
- Blender (optional for extra-smooth mix)
- Freezer (to chill the mug before use)
How I Make Protein Ice Cream in the Dash My Mug
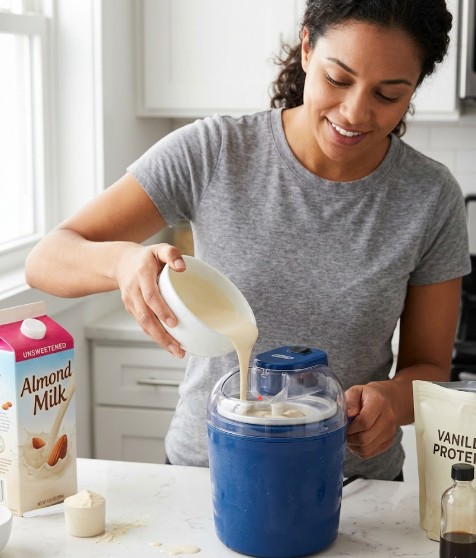
I freeze the Dash My Mug bowl at least 24 hours before I plan to make ice cream. I keep it upright so the inner can cool evenly. My freezer runs at 0°F or colder for best results.
I mix the liquid base next. I pour 1/2 cup unsweetened almond milk into a small bowl or measuring cup, add 2 tablespoons sugar, and whisk until the sugar fully dissolves — about a minute. Then I add one scoop of vanilla protein powder and blend or whisk until smooth with no lumps.
I fold in the richer ingredients to improve texture and flavor. I add 1/4 cup heavy cream, 1/2 teaspoon vanilla extract, and a pinch of salt. I stir until the mixture is smooth and slightly thickened.
I set up the machine while the mixture rests briefly. I remove the frozen mug, place it on a flat surface, attach the motor to the lid, click the paddle into place, and lock the lid by aligning the pins and turning clockwise.
I start churning by plugging in the machine and turning it on. With the paddle spinning, I slowly pour the mixture through the pour chute so it freezes evenly as it mixes.
If I want mix-ins, I add them near the end. I drop small add-ins like chocolate chips, chopped fruit, or nuts through the chute during the last five minutes of churning. This keeps them dispersed without clogging the paddle.
I let the maker run until the ice cream reaches a soft-serve consistency. This usually takes 15–20 minutes. I check at about 15 minutes and stop when it looks thick enough for my taste.
When it’s done, I turn off the motor and unlock the lid by twisting it counterclockwise. I scoop the ice cream into a bowl or eat it straight from the mug. For firmer texture, I transfer it to a container and freeze for another 30–60 minutes.
Quick reference (my usual amounts):
- Almond milk: 1/2 cup
- Sugar: 2 tbsp
- Vanilla protein powder: 1 scoop
- Heavy cream: 1/4 cup
- Vanilla extract: 1/2 tsp
- Pinch of salt
I keep equipment clean and follow manufacturer instructions for safe use and care.
Chef’s Note + Tips
I keep my liquids very cold before starting; chilled almond milk and cream help the mix freeze faster. I follow the recipe portions exactly to prevent overflow. I rinse the paddle and lid right after use to stop residue from sticking. I taste the base before churning and add a little extra sweetener if needed. For easy variations, I stir in a tablespoon of cocoa for chocolate or pulse in frozen berries for a fruit version.
Make Ahead & Storage

I often mix the protein ice cream base a day before to save time. I combine all ingredients, seal the bowl or jar, and chill it in the fridge until I’m ready to freeze.
When I want soft-serve, I pour the cold mixture into the pre-frozen mug and churn, then serve immediately. For firmer ice cream, I place the filled mug in the freezer for 1–2 hours, covered with a lid or plastic wrap.
I keep leftovers in the freezer up to about one week. If it freezes too hard, I let it sit at room temperature for 10 minutes before scooping.
Signs it’s spoiled: off smell, sour taste, or heavy ice crystals — I toss it and make a new batch.
How I Serve Dash My Mug Protein Ice Cream
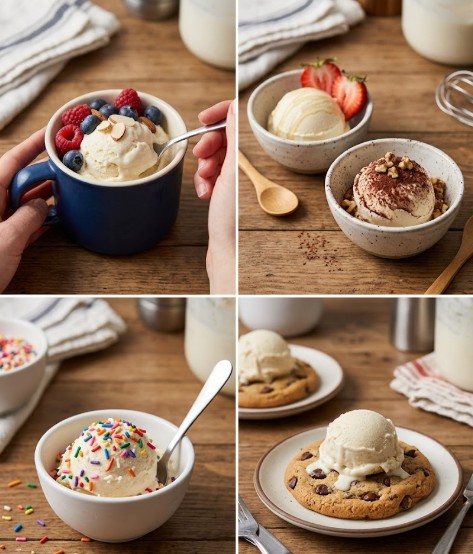
I serve mine right in the mug for a quick, single-serve treat. For extra taste, I add fresh berries, chopped nuts, or a thin drizzle of honey.
When sharing, I scoop into two small bowls so each person gets a neat portion. For kids, I sprinkle colorful sprinkles on top. I sometimes pair a spoonful with a warm cookie to enjoy the contrast of hot and cold.
Dash My Mug Protein Ice Cream Recipe FAQs
Ingredients & What I Use
- 1/2 cup unsweetened almond milk (or any milk you prefer)
- 1/4 cup heavy cream or coconut cream for a dairy-free option
- 1 scoop (about 30 g) vanilla protein powder — whey for creaminess or plant-based if needed
- 2 tablespoons sweetener: granulated sugar, honey, maple syrup, or a sugar substitute like stevia
- 1/2 teaspoon vanilla extract
- Pinch of salt
Notes:
- I pick a protein powder flavor that matches the dessert. If my powder is unsweetened, I add a little more sweetener.
- For lower calories or thinner texture, I use more milk and less cream.
- If I want fruit flavor, I sometimes blend in a small amount of frozen fruit before churning.
How I Make It
- Freeze the Mug
- I put the Dash My Mug bowl in the freezer for at least 24 hours. The freezer should be 0°F (-18°C) or colder. Keep the mug upright so it freezes evenly.
- Combine the Base
- I pour 1/2 cup milk into a bowl or measuring cup, add 2 tablespoons sweetener, and whisk until dissolved.
- I mix in 1 scoop protein powder and stir or blend until smooth with no lumps.
- Add Cream and Flavor
- I add 1/4 cup cream, 1/2 teaspoon vanilla, and a pinch of salt, then stir until the mixture looks smooth and slightly thick.
- Prepare the Machine
- I place the frozen mug on a flat surface, attach the motor and paddle, and lock the lid in place.
- Churning Process
- I turn on the machine and slowly pour the mixture through the chute while it runs.
- I let it spin for 15–20 minutes until the texture resembles soft-serve.
- Add Extras (Optional)
- For mix-ins, I add about 1–2 tablespoons (chocolate chips, nuts, or small fruit pieces) through the chute during the last 5 minutes of churning.
- Firming Up if Needed
- If the ice cream is too soft, I transfer it to a freezer-safe container and freeze for 1–2 hours.
- If it stays soft, I check that the mug was frozen long enough and that ingredients were chilled before churning.
- Serving and Cleanup
- I turn off the machine, unlock the lid, and scoop out the ice cream.
- I rinse the paddle and lid with warm, soapy water, wipe the motor with a damp cloth, and dry parts before storing. The mug is dishwasher-safe, but I hand-wash it to keep it in better shape.
Quick Alternatives
- No Dash My Mug? I blend the mix, pour into a shallow freezer container, and stir every 30 minutes for 3–4 hours to reduce ice crystals.
- For a quick soft-serve, I freeze the mix slightly and pulse it in a blender until smooth.
Nutrition Snapshot (approximate per serving)
- Calories: 290
- Protein: 21 g
- Total fat: 19 g
- Carbs: 12 g
I follow these steps and tweaks to get a creamy, single-serve protein ice cream that fits my taste and diet.
Final Words
I reach for this Dash My Mug protein ice cream when I want something quick and satisfying. It turns out smooth, takes minutes to make, and lets me change flavors or toppings every time. I find it fills the sweet spot between treat and healthy snack. Try a few tweaks—different mix-ins or sweeteners—to make it your own and enjoy a simple, protein-packed dessert.
FAQs
Q1: How well does this protein ice cream work as a post-workout snack?
I find it fills me up and helps muscle recovery when I use a protein powder or high-protein base like Greek yogurt or cottage cheese. It won’t replace a full meal for heavy training, but it gives a quick boost of protein and carbs that aid recovery.
Q2: Is it safe to use a Dash My Mug ice cream maker for protein-based mixes?
Yes. I use dairy or dairy-alternative mixes with protein powder in the Dash My Mug without issues. I make sure the machine is fully frozen per the manual and I don’t overload it. Always follow the device instructions for safe use.
Q3: Will this recipe fit different diets (keto, vegan, low-calorie)?
I can adjust ingredients easily: swap full-fat dairy for coconut cream or heavy cream for keto, use plant-based protein and non-dairy yogurt for vegan, or choose low-calorie sweeteners and lower-fat dairy for fewer calories. Each change affects texture and flavor, so I tweak ratios until it’s right.
Q4: How do I clean and maintain the Dash My Mug after making protein ice cream?
I unplug and remove the frozen bowl, wipe the base, and wash the removable parts by hand with warm soapy water. I avoid submerging the motor base. Regularly checking the manual helps me keep seals and moving parts in good shape.
Q5: How long does homemade protein ice cream last in the freezer?
I store it in an airtight container and use it within 1–2 weeks for best texture and taste. It stays safe longer, but ice crystals grow over time and texture degrades. Thaw slightly before scooping for a creamier result.
Q6: How does this method compare to store-bought high-protein ice cream?
Making it at home lets me control ingredients, flavor, and sugar. Store-bought versions may have stabilizers that keep a softer texture. I sacrifice some commercial creaminess but gain customization and often fewer additives.
Q7: Can I mix add-ins (nuts, fruit, chocolate) into the protein ice cream?
Yes. I add small pieces or swirl-ins near the end of churning or fold them in after churning. Large or hard chunks can stress the small machine, so I chop mix-ins finely and add them sparingly.
Final Thoughts
I find the Dash My Mug protein ice cream an easy, smart way to enjoy a high-protein treat without extra fuss. It mixes simple ingredients, spins quickly in the mini maker, and gives a creamy result that fits many diets and tastes.
- Effectiveness: The device and recipes deliver good texture and flavor in single servings, so you waste less and eat fresher.
- Safety and eco-friendliness: Small-batch, homemade servings let me control ingredients and reduce packaging waste compared with store-bought pints.
- Suitability: This method works well for people seeking higher protein, portion control, or low-carb options when I pick the right ingredients.
I recommend choosing reliable ingredients and following safe dairy and storage practices to get the best, longest-lasting results. Try a few flavor combos and pick one you enjoy — it makes sticking with healthier treats much easier.