
Vacuum Seal Meal Prep Recipes for Effortless Weeklong Healthy Eating
I use vacuum sealing to make meal prep faster and to keep food fresher for longer. Taking air out of containers preserves flavors and nutrients, reduces waste, and helps me portion meals for the week without losing quality.
Vacuum-sealed meals work for breakfasts, lunches, and dinners and suit busy schedules or anyone wanting healthier, ready-to-heat options. I will share simple recipes, prep steps, and practical tips to make vacuum seal meal prep easy and reliable.
Key Takeaways
- Vacuum sealing preserves flavor and extends storage life.
- Proper prep and the right tools make sealed meals convenient.
- Sealed, portioned meals save time and cut food waste.
Ingredients for Vacuum Seal Meal Prep Recipes
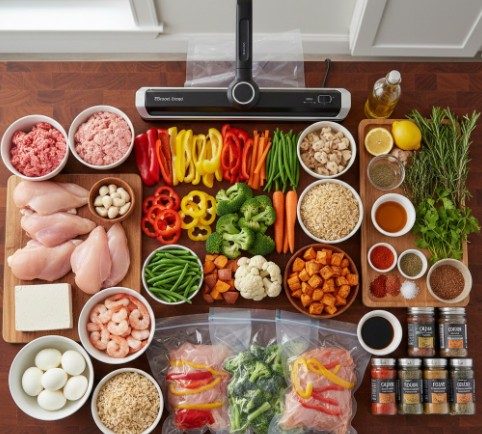
Protein Choices I Use
I pick proteins that stay moist and keep their texture after sealing and reheating. Good options include:
- Chicken (breast or thigh): Skinless pieces that seal well and stay juicy.
- Lean ground beef or turkey: Works for casseroles, sauces, and burgers.
- Fish fillets (salmon, cod): Firm enough to hold shape in sealed packs.
- Firm tofu: Absorbs marinades and stays tender when cooked.
- Hard‑boiled eggs: Ready to eat and handy for quick meals.
- Shrimp: Cooks fast and pairs well with bold flavors.
Tips:
- Cool cooked proteins before sealing to reduce condensation.
- Portion proteins into single servings for quick thawing and reheating.
Vegetables and Starches I Include
I choose vegetables and sides that keep color and texture after vacuum sealing. Common picks:
- Bell peppers: Slice or dice and dry well to prevent extra moisture.
- Broccoli and cauliflower: Blanch briefly to keep them tender‑crisp.
- Carrots: Slice or julienne for easy use in bowls and stir‑fries.
- Green beans: Blanch then cool quickly to lock in color.
- Quinoa or brown rice: Cook fully, cool, and portion before sealing.
- Sweet potatoes: Roast or steam, cool completely, then seal.
Preparation checklist:
- Blanch most cruciferous vegables to preserve texture.
- Cool all hot foods to room temperature before sealing.
- Use small portions to make reheating faster and reduce waste.
Flavorings, Marinades, and Spice Blends I Use
I layer flavors so sealed meals taste fresh when reheated. Useful choices include:
- Oil‑based marinades: Olive oil, lemon juice, garlic, and herbs for balance.
- Soy sauce blends: Soy, ginger, and honey for sweet‑umami profiles.
- Dry rubs: Paprika, cumin, garlic powder, salt, and pepper for depth.
- Fresh herbs: Rosemary, thyme, cilantro added before sealing or after thawing.
- Pre‑mixed spice blends: Cajun, Italian, or curry powders for variety.
Practical notes:
- Marinate proteins in the bag before vacuuming for faster flavor absorption.
- Keep wet marinades moderate to avoid excess liquid that can interfere with the seal.
- Store strong herbs or citrus separately if you want brighter flavor on reheating.
Equipment Needed for Vacuum Seal Meal Prep

My Vacuum Sealing Machine
I use a reliable vacuum sealer as the main tool for keeping meals fresh. I look for strong sealing power so bags close airtight and no air remains. I prefer machines with simple controls so I can seal meals fast without fuss.
Size matters to me: the unit should fit my counter or a cupboard and be easy to move. I also pick models that work with many bag widths and types. Adjustable vacuum modes help me protect soft foods like fish and berries from getting crushed. Built-in cutters and a clear sealing strip save time and reduce extra steps.
Bags, Pouches, and Airtight Boxes
I choose the right storage for each food. Reusable, heavy-duty bags work well for stews and marinated meats because they handle heat and liquids. Single-use bags are lighter and cheaper, so I use them for dry goods and portioned vegetables.
I keep a few rigid, airtight containers for salads and foods with sauces; these stop liquids from getting squeezed out and stack neatly in the fridge. I always pick BPA-free, food-grade materials for safety. Measuring portions before sealing helps me keep meals consistent and prevents waste.
Quick checklist for my supplies:
- Reusable vacuum bags (thick, durable)
- Single-use vacuum bags (various sizes)
- Rigid vacuum-safe containers with lids
- Label stickers or freezer tape
Extra Tools I Rely On
I keep simple kitchen tools close to make prep smoother. A sharp knife and a sturdy cutting board let me chop quickly and keep pieces the right size for sealing. Mixing bowls make it easy to combine ingredients and marinate proteins before packaging.
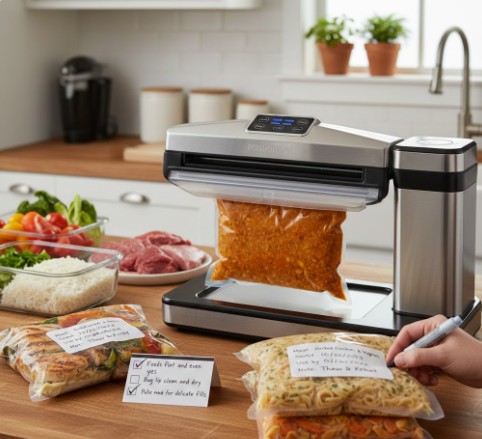
I use measuring cups and spoons to keep flavor and nutrition consistent across meals. For organization, I write the date and contents on bags with a permanent marker or label. When sealing loose items like berries or chopped veggies, I pre-freeze them on a tray so pieces don’t clump together.
Small additions that save time:
- Freezer trays or racks for flash-freezing
- Permanent markers and labels
- A bench scraper or spatula to level contents before sealing
These tools together form a compact, efficient prep station that helps me save time and keep meals fresh throughout the week.
Preparing Ingredients for Vacuum Seal Meal Prep
Cleaning and Cutting Produce
I wash all produce under cold running water to remove dirt and residues. I lightly rub firm vegetables and use a brush for roots. I dry items fully with a clean towel or salad spinner to reduce extra moisture that can cause freezer damage.
I cut ingredients into even pieces so they cook the same and pack neatly. Examples I use:
- Carrots and sweet potatoes: 1/2-inch rounds or cubes
- Bell peppers: 1-inch strips
- Broccoli: small florets
- Proteins (chicken, tofu): bite-sized cubes or thin strips
I trim fat from meats and remove tough stems from greens. I keep delicate herbs whole or roughly chop them last to keep flavor bright.
Dividing into Serving Sizes
I portion meals to match how I will eat them later. I either weigh items on a kitchen scale or use measuring cups to keep servings consistent. Typical portions I use:
- Chicken breast: 4–6 oz (about one serving)
- Cooked grains: 1/2 cup
- Vegetables: 1 cup mixed
I arrange single-serve packs for grab-and-go lunches and larger family packs for shared meals. I flatten contents into even layers inside the vacuum bag so the seal is strong and the package freezes fast. I label each bag with contents, date, and reheating notes before sealing.
Quick checklist I follow when portioning:
- Balance protein, starch, and vegetables
- Keep sauces and wet ingredients on the bottom or in separate small pouches if needed
- Avoid overfilling bags; leave room for proper vacuuming
Flavoring and Tenderizing
I season and marinate to lock in flavor before sealing. I prefer simple marinades with oil, acid (lemon or vinegar), garlic, and herbs. For dry seasoning, I rub spices directly on meat or toss vegetables with spice blends and a little oil to help the spices stick.
Practical marinating tips I use:
- Marinate proteins at least 30 minutes or up to overnight in the fridge
- Use thicker marinades or pastes rather than watery ones to avoid excess liquid when sealing
- For quick meals, apply a dry rub or toss veggies with seasoning right before sealing
Sample simple marinade I use often:
- 2 tbsp olive oil, 1 tbsp lemon juice, 2 minced garlic cloves, 1 tsp smoked paprika, salt and pepper
After marinating, I make sure the coating reaches all pieces. If I want a crisper texture after reheating, I sometimes vacuum-seal proteins raw and add a light sauce separately so I can brown or crisp after thawing.
Vacuum Sealing Process
Proper Steps to Seal My Meals
- Choose a sturdy, food-safe vacuum bag and trim it so the open end has about 3 inches extra for the seal.
- Put the cooked or prepped portions into the bag and spread them flat to save space and help the sealer work evenly.
- Wipe the bag edge dry and place it straight into the machine’s sealing channel so the lip sits evenly.
- Run the vacuum cycle. The machine should pull out air, press the bag tight around the food, then fuse the plastic into an airtight seam.
- Inspect the sealed edge. I look for a smooth, unbroken line without wrinkles or gaps to confirm a good seal.
- Tip: If the food is hot, cool it first to avoid steam that can interfere with the seal.
- Tip: For raw meats, freeze briefly or use a drip tray to prevent juices from entering the sealer.
Preventing Air Pockets and Crushing
- Lay items in a single layer when possible. Overcrowding traps air and makes seals weaker.
- For liquids or saucy dishes, freeze them in a container until solid, then transfer to the vacuum bag. This stops liquid from being pulled into the sealer and creating voids.
- Use the machine’s pulse or manual mode if it has one. I remove air slowly and stop to reposition food so edges sit flat.
- For fragile items like chips, leave a small cushion of air so they don’t get crushed. I also use parchment or paper between layers for delicate textures.
Quick checklist:
- Foods flat and even: yes / no
- Bag lip clean and dry: yes / no
- Pulse mode used for delicate fills: yes / no
Marking and Dating My Packed Meals
I label every sealed bag to stay organized and safe. I write directly on the bag with a permanent marker or use a freezer-proof label.
Essential label items:
- Meal name (what’s inside) — e.g., “Turkey Chili.”
- Date sealed — the day I vacuum sealed it.
- Use-by date — based on storage: short term for the fridge, longer for the freezer (follow safe storage times).
- Quick notes — reheating or thawing steps, allergens, or portion size.
I follow a simple format:
- “Meal: [name] | Sealed: [MM/DD/YYYY] | Use by: [MM/DD/YYYY] | Note: [thaw overnight]”
Keeping labels clear and consistent helps me rotate food and avoid waste.
Cooking Methods for Vacuum Sealed Meals
Precision Water-Bath Cooking (Sous Vide)
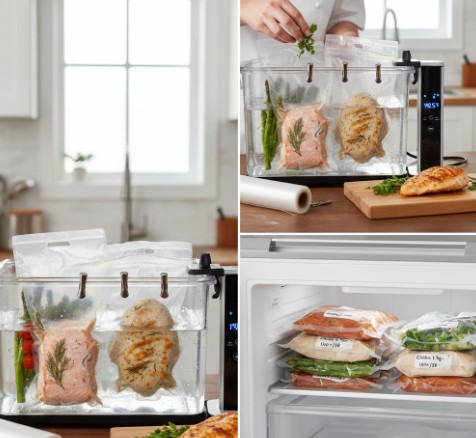
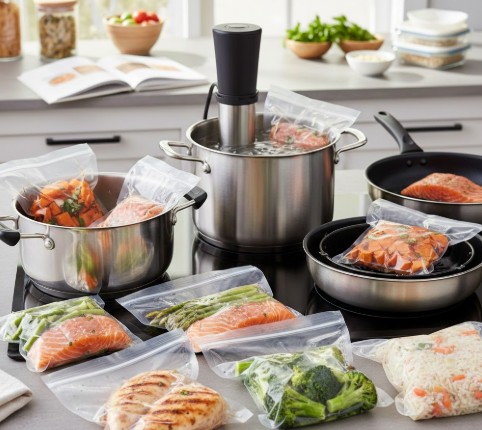
I use a water-bath method when I want even, predictable results from vacuum sealed meals. I set the water to the exact temperature the recipe calls for, then fully submerge the sealed bag so heat reaches the food evenly. Typical targets I use: chicken breasts around 140°F (60°C) for 1.5–2 hours, salmon near 125°F (52°C) for 45–60 minutes, and many vegetables closer to 183°F (84°C) for 30–45 minutes.
After the cook, I take the bag out, dry the food, and optionally sear meats or toast vegetables quickly in a hot pan for color and texture. This method keeps juices locked in and helps preserve nutrients, while preventing overcooking. I trust sous vide when I need consistent doneness, especially for proteins that dry out easily with other methods.
Practical tips I follow:
- Remove air pockets so the bag sinks and water contacts all surfaces.
- Use clips to keep bags from floating.
- Finish proteins on a very hot surface for 30–60 seconds per side for a browned crust.
Freezing and Long-Term Storage
I freeze vacuum sealed meals to extend shelf life and keep them tasting fresh. I lay bags flat in the freezer so they freeze solid in thin, stackable sheets that save space and thaw evenly. I write the meal name and date on each bag with a permanent marker so I can rotate stock and use older meals first.
Rough freezer-time guidelines I use:
- Cooked meats: about 6–12 months
- Vegetables: roughly 8–12 months
- Grains (cooked): about 6–12 months
- Seafood: shorter, around 2–6 months
I avoid refreezing meals that have fully thawed because quality drops each time. I also pick high-quality, food-safe vacuum bags that are BPA-free and designed for freezing to reduce risk of freezer burn. For very liquid dishes, I freeze them flat first until solid, then vacuum seal or finish sealing to prevent leaks during the vacuum process.
Heating Up Vacuum Sealed Meals
I reheat sealed meals in ways that keep texture and safety in mind. When possible, I reheat in a water bath set to the serving temperature; 30–60 minutes usually brings a refrigerated or frozen meal up gently without overcooking. For faster reheating, I drop the sealed bag into boiling water for about 5–10 minutes, but I monitor closely so delicate foods don’t overcook.
I never microwave food inside vacuum bags that aren’t labeled microwave-safe. Instead, I transfer contents to a microwave-safe dish and heat in short bursts, stirring between intervals. If I use an oven, I take the food out of the bag, place it in a covered dish or tent with foil, and heat at about 350°F (175°C) until warm throughout.
Always check temperature: I aim for reheated leftovers to reach at least 165°F (74°C) to reduce food-safety risks. If texture or appearance matters, I give food a quick finish—like a hot pan sear—to restore crispness or caramelization before serving.
Sample Vacuum Seal Meal Prep Recipes

Chicken & Veggie Mix
I cut 1.5 lbs boneless skinless chicken into 1-inch pieces and toss it with 2 cups broccoli florets, 1 cup mixed bell peppers, and 1 cup sliced baby carrots. I add 2 cloves minced garlic, 2 tbsp olive oil, 1 tsp dried thyme, 1 tsp smoked paprika, and salt and pepper to taste, then toss until everything is evenly coated.
I divide the mix into vacuum bags, spread contents flat to remove air, and seal tightly. I label each bag with the meal name and date. For quick use I sous vide at 145°F (63°C) for 1.5 hours; otherwise I freeze for later.
Benefits: this method keeps colors and moisture, so the chicken stays tender and the vegetables keep texture after reheating.
Beef Stir-Fry Packs
I use 1 lb lean ground beef or thinly sliced flank steak and cook it briefly until just done, then let it cool. I mix the beef with 1.5 cups sliced green beans, 1 cup shredded carrots, 1 cup sliced mushrooms, 2 tbsp low-sodium soy sauce, 1 tbsp sesame oil, 1 tsp grated ginger, and 1 tbsp chopped green onions; I add 1/2 tsp crushed red pepper flakes if I want heat.
I portion the mixture into vacuum bags, lay them flat, and seal. I mark each pack with the meal and date. For tender results I sous vide at 140°F (60°C) for 1–1.5 hours, or freeze the packs for later use.
Benefits: vacuum sealing helps the sauce soak into the meat and cuts down on spoilage while saving prep time on busy nights.
Veggie Quinoa Bowls
I cook 1 cup dry quinoa with 1.5 cups water or vegetable broth, then fluff it once done. I roast or steam 1 cup diced sweet potatoes until tender, and steam 1 cup green beans. I combine the quinoa with the sweet potatoes, 1 cup chopped bell peppers, 1/4 cup chopped parsley, 2 tbsp olive oil, 1 tsp ground cumin, and salt and pepper to taste.
I divide the bowl into vacuum bags, press flat to remove air, and seal. I label each bag and refrigerate up to 4–5 days or freeze for longer storage. Reheat by sous vide or microwave as needed.
Benefits: the sealed bowls keep texture and flavor, and they make a simple grab-and-go plant-based meal.
Quick Cooking & Storage Cheat Sheet
I use this quick table to keep cooking and storage clear:
| Recipe | Approx. Bag Weight | Sous Vide Temp | Time | Refrigerator | Freezer |
|---|---|---|---|---|---|
| Chicken & Veggie Mix | ~1.5 lbs | 145°F (63°C) | 1.5 hours | 3–5 days | Up to 3 months |
| Beef Stir-Fry Packs | ~1 lb | 140°F (60°C) | 1–1.5 hours | 3–4 days | Up to 3 months |
| Veggie Quinoa Bowls | ~1.2 lbs | N/A (reheat) | N/A | 4–5 days | Up to 2 months |
Label each bag with the meal name, prep date, and a use-by date. I find this simple habit helps rotate meals and avoid waste.
Make-Ahead Tips for Vacuum Seal Meal Prep
Planning Meals Ahead for Smooth Prep
I plan meals so cooking and sealing feel fast and organized. I pick recipes that hold up well after vacuum sealing, like cooked proteins, roasted vegetables, and sturdy grains. I map meals for the week to cut decision time and batch similar ingredients—cooking all chicken or rice at once saves time and lets me mix flavors later.
I use portion control to measure single servings before sealing. This helps with balanced eating and makes reheating simpler. I also rotate meal types—meat, vegetarian, seafood—to keep meals interesting and avoid repeating the same flavors.
I check my fridge and freezer space before I start. Knowing how much room I have prevents overcrowding and helps me decide which items go in the fridge versus the freezer.
Key planning actions:
- Map weekly meals to reduce daily decisions
- Batch cook core ingredients to save time
- Portion servings for easy reheating and calorie control
- Rotate meal categories to avoid flavor fatigue
- Confirm storage capacity before sealing
Keeping Vacuum-Sealed Meals Fresh Longer
I store vacuum-sealed meals with attention to temperature and labeling so they stay safe and tasty. For items I’ll eat in a few days, I keep sealed meals in the fridge at or below 40°F (4°C). For longer storage, I freeze sealed meals right away; most meals maintain good quality for up to six months in a properly set freezer.
I label every package with the meal name, sealing date, and a use-by date. Clear labels make it easy to rotate stock and use older meals first. I also avoid thawing and refreezing; repeated temperature changes harm texture and flavor.
To save space and speed freezing, I lay bags flat before they freeze. This creates thin, stackable packets that freeze evenly.
Quick storage guide:
- Refrigerator: ≤ 40°F (4°C); use within 3–5 days (sooner for very perishable items)
- Freezer: 0°F (-18°C); up to about 6 months for best quality
- Dry goods sealed: store in a cool, dry place away from heat and light
Practical tips:
- Freeze immediately after sealing for longest shelf life
- Label with name and dates for easy rotation
- Stack flat bags to maximize space and speed freezing
- Avoid thaw-refreeze cycles to keep texture and taste intact
Closing Thoughts
I use vacuum sealing to make meal prep faster and more reliable. It keeps portions fresh, locks in flavor, and helps me avoid daily cooking stress.
By planning meals and using the right tools, I cut food waste and save time each week. This method supports healthier choices and makes busy days easier to manage.
- Saves time
- Reduces waste
- Keeps food fresher longer
Frequently Asked Questions
What are the main perks of using a vacuum sealer for meal prep?
I lock out air to keep food tasting fresh longer. Vacuum sealing preserves nutrients and slows spoilage. It also saves me time, cuts down food waste, and makes portion control easier for the week.
Which foods work best for vacuum-sealed meal prep?
I pick firm proteins and sturdy vegetables. Chicken, fish, tofu, broccoli, peppers, and carrots hold up well. I also use marinades or spice blends to boost flavor and keep food moist.
What tools do I need to vacuum-seal meals?
I use a reliable vacuum sealer and food-safe bags or containers made for sealing. I keep basic kitchen tools handy—cutting board, knife, measuring cups, and labels for dating packages.
How should I get ingredients ready before sealing?
I wash produce, cut items into even pieces, and portion meals consistently. I season or marinate before sealing, and dry surfaces when needed to help the seal hold.
What are the main steps during the sealing process?
I portion the food into bags, remove as much air as possible, and create a secure seal. I write the contents and date on each bag. I check seals for gaps before freezing or storing.
Can I cook vacuum-sealed food with sous vide?
Yes. I use sous vide to cook sealed proteins and some vegetables because it keeps juices, texture, and nutrients. I follow safe temperature and time guidelines for each ingredient.
How long will vacuum-sealed meals keep in the freezer?
Typical storage ranges from about 1 to 3 months, depending on what I packed. I avoid thaw-refreeze cycles and keep the freezer at a steady temperature to maintain quality.
What are safe reheating methods for vacuum-sealed meals?
I reheat with sous vide, by boiling the sealed bag, in the oven after removing the bag, or in the microwave after transferring to a microwave-safe dish. I always confirm meals reach safe internal temperatures.
Will vacuum sealing reduce my food waste?
Yes. I find vacuum sealing extends usable life and prevents freezer burn, so I toss less food. Better organization and portioning also help me use what I buy.
What are a few simple vacuum-seal meal ideas?
I make chicken with mixed vegetables, beef stir-fry packs, and vegetarian quinoa bowls. These pack well, freeze cleanly, and reheat without losing much flavor.
FAQs
Q1: How well does vacuum sealing keep meal prep fresh?
I find vacuum sealing slows down spoilage by removing air and reducing freezer burn. For most cooked meals, vacuum-sealed packages stay good longer in the fridge and especially in the freezer compared with regular containers. Always check smell and texture before eating.
Q2: Is vacuum sealing safe for all kinds of food?
I use vacuum sealing for meats, cooked grains, soups (after cooling), and many vegetables. I avoid sealing fresh soft cheeses, raw mushrooms, and some high-risk items without proper refrigeration because low-oxygen environments can help certain bacteria grow. For safety, follow cold-chain rules and label dates.
Q3: How long can I store vacuum-sealed meals?
Storage time varies by food type and storage temperature. In the fridge, expect a few days for cooked meals. In the freezer, many meals last months with much less quality loss than non-sealed packs. I always label bags with contents and date to avoid guesswork.
Q4: What maintenance does a vacuum sealer need?
I clean the sealing bar and gaskets after use, remove crumbs or liquid, and check the sealing strip for wear. Replace any damaged gaskets or strips per the manufacturer’s guidance. Proper care keeps seals tight and extends the machine’s life.
Q5: How does vacuum sealing compare to other storage methods?
Compared to freezer bags or plastic containers, vacuum sealing often preserves texture and flavor better and reduces freezer burn. It also saves space. However, it costs more in bags and requires a machine. I weigh convenience, cost, and how long I plan to store food.
Q6: Can I freeze and reheat vacuum-sealed meals directly?
I usually thaw vacuum-sealed meals in the fridge before reheating. For sous-vide or gentle reheating, you can reheat from frozen in a water bath if the pouch is rated for it. Avoid microwaving sealed bags unless the manufacturer says they are microwave-safe.
Q7: Are there limits to portioning and recipe types for vacuum sealing?
I portion meals into single servings or family-size packs that fit my routine. Saucy or liquid-heavy meals need careful handling—chill or pre-freeze liquids before sealing to avoid loss of seal. Some delicate foods may change texture after freezing, so test recipes before large batches.
Conclusion
I recommend vacuum-sealed meal prep for anyone who wants fresher food, less waste, and easier planning. It keeps meals tasting better longer, cuts freezer burn, and helps you control portions and nutrients.
I find vacuum sealing safe when you follow basic food-safety steps: chill hot foods before sealing, use appropriate bags, label with dates, and reheat to safe temperatures. For long-term storage, choose a high-quality sealer and proper freezer-safe bags to protect flavor and texture.
Vacuum sealing also reduces single-use packaging and food spoilage, so it can be a greener choice for weekly cooking. It works well across proteins, vegetables, sauces, and full meals, and it pairs nicely with sous-vide cooking.
If you want consistent results, invest in a reliable vacuum sealer and learn a few simple routines: portion, cool, seal, and date. Doing so makes meal prep faster, safer, and more efficient.
Give vacuum-sealed meal prep a try and you’ll likely save time, lower waste, and enjoy better-tasting meals all week.

