
J Lube Recipes: Proven Formulations and Practical Mixing Guide
I work with J Lube often and have seen how its thick, slick feel helps in many tasks. It serves well across shops and kitchens because you can change its thickness and slip by mixing different ingredients and following simple steps. Knowing the right mix and tools keeps work smoother and cuts down on cleanup time.
This article will show easy recipes and small tweaks to get the texture you need for each job. I will also cover practical prep steps, safe use, and quick cleanup tips so you can use J Lube confidently and efficiently.
Key Takeaways
- Learn straightforward ways to adjust J Lube’s texture for different uses.
- Follow simple prep and mixing steps to get consistent results.
- Use basic safety and cleanup practices to protect tools and workspaces.
Ingredients for J Lube Recipes
Core Components I Use
- J Lube powder — the main powdered base that forms the slippery body of the mix.
- Distilled water — I prefer this to avoid minerals or contaminants that change texture.
- Mixing vessel — a clean container sized for the batch I plan to make.
- Stirring implement — a spoon, whisk, or paddle to break lumps and blend thoroughly.
Typical proportions I follow:
- J Lube powder: about one packet (roughly 4 oz)
- Distilled water: about 1 quart (32 fl oz)
These give a reliable starting texture. I adjust water or powder to reach thicker or thinner consistency as needed.
Additions I May Use to Modify Texture or Performance
I keep a few optional ingredients on hand to tweak viscosity, appearance, or shelf life.
- Glycerin — 1–2 tbsp per quart to increase slipperiness and moisture retention.
- Food-grade dye — a few drops to tint the batch for easy ID without altering feel.
- Preservative (follow product directions) — to extend storage life for homemade batches.
- Essential oils — 2–3 drops for mild scent and extra antimicrobial effect when appropriate.
How I apply them:
- Start with the core mix, then add small amounts of any add-in and test.
- Record exact amounts so I can replicate successful batches later.
Equipment Needed
Tools for Mixing
I use a few basic tools to get a smooth, consistent mix.
- Stirring paddle or rod — pick a strong stainless steel or food-safe plastic paddle that reaches the bottom and scrapes the sides. It helps break up clumps and fold ingredients evenly.
- Whisk or electric hand mixer — a whisk works for small batches. For larger batches I use a low-speed hand mixer to speed blending and reduce lumps.
- Measuring set — I keep dedicated measuring cups and spoons for powder and water. Accurate measures give repeatable results.
- Mixing vessel — I choose a clear, roomy container so I can stir without spilling and watch the texture. Glass or food-grade plastic both work.
Quick reference:
- Stirring tool: stainless steel/plastic — scrapes and blends
- Whisk/hand mixer: stainless steel/plastic — evens texture quickly
- Measuring cups/spoons: glass/plastic — precise amounts
- Mixing container: glass/plastic (clear) — room to mix and observe
Containers for Storage
I store finished blends so they stay fresh and clean.
- Airtight jars or bottles — I use glass jars with tight lids or BPA-free plastic bottles to block air and contamination.
- Dark or opaque containers — if I include light-sensitive additives, I transfer the mix into shaded glass or colored plastic to reduce light exposure.
- Wide-mouth openings — jars with wide mouths make scooping or pouring easier and cleaner.
- Labels — I write the mix date and brief notes on each container so I know age and ingredients at a glance.
Storage guide:
- Airtight glass jar (e.g., mason) — long-term freshness, easy to clean
- BPA-free plastic jar — lightweight and durable
- Opaque container — protects light-sensitive formulas
- Wide-mouth jar — simple access and transfer
I clean and dry all tools and containers before use to avoid contamination and to keep mixes stable.
Prep Work
Measuring Your Materials
I weigh powders and measure liquids precisely to get a steady texture. I use a digital scale for powders and small graduated cylinders or syringes for liquids. Zero the scale with the container every time to avoid dosing mistakes.
Typical targets I use for a basic mix:
- J Lube powder: 100 g
- Distilled water: 1 L
- Glycerin: 10–15 mL (optional)
- Preservative: 0.5–1% by weight (optional)
- Dye or essential oils: a few drops (optional)
I add liquids to the powder slowly while stirring to stop clumps. I measure liquids separately and combine them gently, then adjust small amounts if the mix feels too thin or thick.
Setting Up My Work Area
I keep my workspace clean and organized so mixing goes smoothly and contamination stays low. I sanitize the work surface and tools before starting and keep everything I need within arm’s reach.
My setup checklist:
- Large, clean mixing bowl or container
- Spare stirring tools (spoons, spatulas)
- Digital scale and measuring syringes or spoons
- Paper towels or absorbent mat under the container
- Good lighting and a stable work surface
I also label containers immediately after mixing with the recipe name, date, and any additions. That simple step helps me track batches and avoid confusion later.
Instructions for Making J Lube
Step 1: Prepare the Base Mix
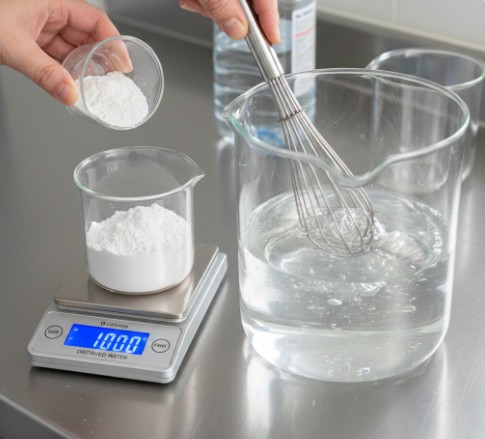
I weigh the powder precisely and pour measured distilled water into a clean container. I add the powder slowly to the water while stirring to cut down on clumps. I use a whisk or stirring rod and stir in a steady, circular motion for several minutes until the liquid looks even and slightly thicker. I keep an eye out for any lumps and continue until the texture feels uniform.
- Equipment: digital scale, whisk or stirring rod, clean container
- Target ratio example: 100 g powder : 1 L distilled water
- Tip: distilled water reduces impurities that change the feel
Step 2: Mix in Optional Add-Ons
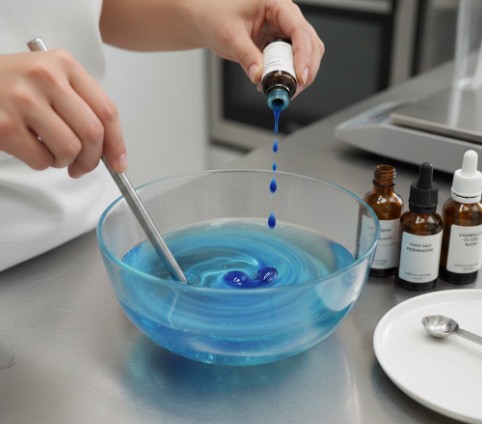
I add optional ingredients one at a time while stirring so they blend evenly. For a smoother, more slippery result I add a small amount of glycerin. I can add 3–5 drops of food-safe dye if I want color. If I plan to store the product longer, I include a tiny dose of a food-safe preservative. For scent or mild antimicrobial benefit, I add a couple of drops of an essential oil that is safe for intended use. I stop and stir thoroughly after each addition.
- Examples and purposes:
- Glycerin: makes it silkier
- Food dye: color coding
- Food-safe preservative: extends shelf life
- Essential oils: mild scent and antimicrobial properties
- Caution: add minimal amounts and test compatibility with intended use
Step 3: Blend and Store Properly
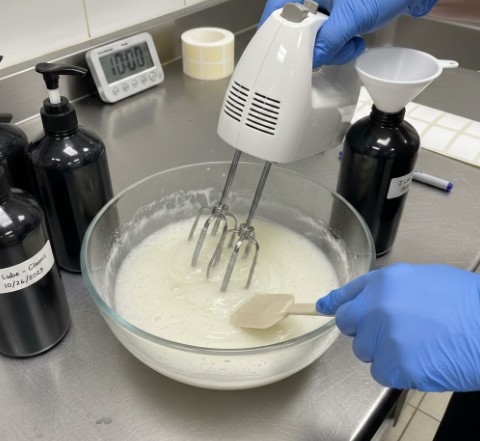
I blend the mixture with a hand mixer or whisk on medium speed for a few minutes to remove streaks and dissolve any remaining powder. I scrape the sides of the container periodically to incorporate residue. After mixing, I let the batch sit about ten minutes so bubbles settle and the texture evens out. I then transfer the finished product into airtight, opaque containers and clearly label them with the date and contents.
- Blending time: ~3–5 minutes
- Rest time: ~10 minutes
- Storage: airtight, opaque containers; label with date and ingredients
Directions for Use
How I Apply the Lubricant
- Clean and dry the surface or tool before I put any J-Lube on it. This cuts down on dirt and helps the lubricant work better.
- I spread a thin, even coat to avoid clumps and mess. A light layer usually gives the best results.
- I pick the right applicator for the job: a soft cloth for small areas, a brush for textured surfaces, or a spray bottle for larger, even coverage.
- For new materials or sensitive equipment, I always do a small patch test first. That lets me check for any unwanted reactions.
- I watch the area in use and reapply when friction increases or performance drops.
- I never mix J-Lube with oils, solvents, or strong chemicals. Mixing can change the texture and reduce effectiveness.
Keeping It Fresh and How Long It Lasts
I store prepared J-Lube to keep it usable and safe:
- Container: I use airtight, dark containers like opaque bottles or sealed jars to block air and light.
- Place: I keep jars in a cool, dry spot away from sunlight. That slows breakdown and preserves texture.
- Temperature: I aim for room temperatures around 50–77°F (10–25°C) when possible.
- Labeling: I mark each container with the mix date and ingredients so I know how old it is.
- Handling: I avoid putting dirty tools or water into the container to lower the risk of contamination.
Typical shelf life: When stored this way, I expect good performance for about 6 months. After that time, the texture or slipperiness may change and I would consider remaking a fresh batch.
Variations of J Lube Recipes
Cooling-Effect J Lube Blend
I make a cooling version by adding a menthol component to the classic mix. Use about 100 g of J Lube powder and 1 L of distilled water. Dissolve the powder fully, then slowly stir in roughly 10 g of finely crushed menthol crystals.
I sometimes add 5 g glycerin for extra slipperiness. Mix until even and store in an airtight, labeled container away from heat and sunlight.
Note: test a small amount first to check for sensitivity or surface reactions.
Fragranced J Lube Options
I add food-grade essential oils when a scent or mild antimicrobial lift is helpful. Start with the basic J Lube base (100 g powder to 1 L water). Add 5–10 drops of a chosen oil such as lavender, peppermint, or citrus. For stronger antimicrobial effect, use tea tree at 3–5 drops.
Stir thoroughly so the fragrance disperses evenly and label the container with the oil and amount used. I always perform a patch test before wider use to ensure compatibility with skin or materials.
Heavier-Body J Lube (Thickened)
When I need less drip and more staying power, I thicken the mix with xanthan gum. Combine 100 g J Lube powder with 1 L distilled water and hydrate until smooth. Sprinkle 5–10 g xanthan gum slowly while whisking to avoid lumps.
I often add 5 g glycerin for a softer feel. Let the mixture rest 15–20 minutes so viscosity stabilizes. Use this table to choose thickness:
- 5 g xanthan gum — slightly thicker than standard, easy spread
- 7.5 g xanthan gum — medium thickness, good for general use
- 10 g xanthan gum — gel-like, minimal drip for vertical surfaces
I adjust xanthan amounts to match the job: lower for easy spreading, higher for cling and minimal runoff.
Safety and Cleanup Tips
Personal Safety Steps
I wear gloves and eye protection whenever I handle powdered or mixed lubricant to stop skin and eye contact.
I work where air moves well to lower any chance of breathing dust or vapors, especially if I add scents or preservatives.
I never eat, drink, or prepare food near the mixing area, and I keep all materials out of reach of children and pets.
Before full use, I test a small amount on the intended surface to check for reactions or damage.
I keep liquids away from electronics and power outlets to prevent short circuits or equipment harm.
Cleaning Methods After Use
I remove excess lubricant right away using a damp cloth to make cleanup easier.
I wash containers, tools, and surfaces with warm water and mild soap; I avoid harsh solvents that could harm equipment.
I let items dry completely before storing them to stop mold and bacteria from growing.
When I sanitize a workspace, I use a suitable disinfectant after the initial cleaning to keep the area hygienic.
I avoid pouring large amounts of the mixture down drains; I collect excess and dispose of it as solid waste if required.
Dealing with Spills and Waste
For powder spills, I sweep gently and avoid actions that create dust clouds; I do not use compressed air.
For liquid spills, I soak up the material with absorbent cloth or paper, then clean the spot with warm, soapy water.
I place used cloths, paper towels, and other waste into sealed bags before disposal to limit leaks and odors.
I follow local rules for disposing of chemical or medical-type waste when applicable.
Quick Reference: Main Safety and Cleanup Tips
| Topic | My Action |
|---|---|
| Protective gear | Gloves and safety goggles |
| Air quality | Work in a well-ventilated area |
| Storage | Airtight, labeled, childproof containers |
| Immediate cleanup | Wipe excess with damp cloth |
| Washing | Warm water and mild soap |
| Drying | Air or towel dry fully |
| Powder spill | Sweep gently, avoid dust clouds |
| Liquid spill | Absorb, clean with soapy water |
| Disposal | Seal waste in bags; avoid drains |
Conclusion
I refine J-Lube mixes to fit each task, choosing ingredients and steps that give a steady feel and reliable performance. I store and handle the product so it stays usable and easy to apply, and I follow simple cleanup and safety steps to keep my workspace safe. I try small variations when a job needs a different texture or slip, while keeping the base formula intact. These habits help me get consistent results and make J-Lube a practical tool I can count on across many projects.
Frequently Asked Questions
What is J Lube and which fields use it?
I know J Lube as a powdered concentrate that turns into a smooth, water-based lubricant when mixed. People use it in workshops, automotive shops, machine maintenance, and some food-processing settings where a slippery, water-based product helps reduce friction.
What do I need for a basic J Lube batch?
I gather J Lube powder and distilled or boiled water as the core ingredients. I also use a clean mixing container and a stirring tool. Optional items I might add are glycerin, preservatives, food-grade color, or gentle fragrance.
How can I get the best texture when I mix it?
I measure precisely — a common ratio is about 100 g powder per liter of water — and add the powder slowly while stirring. I mix thoroughly until smooth and adjust small amounts of water or additive to reach the feel I want.
Which tools work well for mixing and storage?
I use a whisk, paddle, or hand mixer for even blending and a clear container to watch consistency. For storage I choose airtight, opaque jars or bottles and label them with the date and contents.
How should I set up my workspace before I make it?
I clean and sanitize surfaces first, lay out measured ingredients, and use a digital scale and good lighting. I keep towels and a trash bin handy to limit spills and contamination.
How long does mixed J Lube keep?
I store mixed J Lube in sealed containers in a cool, dry spot. Under those conditions, I expect good texture and performance for about six months, though I check for odor or separation before use.
Can I change the formula for different uses?
Yes. I add glycerin for extra slip, xanthan gum to thicken, preservatives to extend shelf life, color for identification, or essential oils for scent. I test small batches to be sure changes work for the intended use.
What safety and cleanup steps do I follow?
I wear gloves and keep the area ventilated. I avoid ingestion and contact with eyes. After use I wipe excess away, wash tools with warm soapy water, and dispose of waste per local rules.
What are common recipe tweaks people make?
I often see recipes that add menthol for a cooling effect, essential oils for scent, or xanthan gum for a thicker gel. Small changes can change feel and performance, so I try modest amounts first.
How should I apply J Lube for best results?
I prepare surfaces by cleaning and drying them as needed, apply a moderate amount, and spread evenly with a tool or by hand. I test a hidden area if compatibility is a concern and reapply when slipperiness drops.
FAQs
Q1: Is J-Lube an effective lubricant for personal or equipment use?
I find J-Lube works well as a thick, slippery lubricant when mixed correctly. It creates a slick, gel-like texture that reduces friction. For sensitive skin or medical uses, I recommend testing a small skin patch first and choosing food-grade or veterinary-grade products when needed.
Q2: Is J-Lube safe to use on skin and with latex?
I treat J-Lube as generally safe for skin if mixed with clean water and kept free of contaminants. It is usually latex-safe, but I still test a small area or a single condom first. Avoid using it near open wounds, eyes, or mucous membranes unless the product labels say it is intended for such use.
Q3: How much area does a typical J-Lube mix cover?
Coverage depends on concentration and intended use. A common mix is about 1 teaspoon of powder per cup (240 ml) of water for a thick lube; that yields small batches suitable for personal use. For larger areas or events, scale the mix proportionally—double or triple ingredients while keeping the same ratio.
Q4: How do I store and maintain J-Lube once mixed?
I store mixed J-Lube in a clean, sealed container in the fridge and use it within a week to avoid bacterial growth. Always use sterilized utensils and containers when making and dispensing it. If the mix smells off, changes color, or shows mold, I discard it immediately.
Q5: How does J-Lube compare to commercial lubricants?
Compared to store-bought gels, J-Lube is cheaper and easy to make in bulk. It can feel thicker and may be messier. Commercial products often include preservatives and additional ingredients for sensitivity, scent, or longevity—features J-Lube lacks unless you add compatible, safe additives.
Q6: Can J-Lube harm materials like plastics, metals, or fabrics?
I generally see J-Lube as non-corrosive, but it can stain fabrics and attract dirt because of its thick nature. For sensitive equipment, test on an inconspicuous spot first. Wipe away excess and clean surfaces after use to prevent buildup.
Q7: What safety steps should I follow when making or using J-Lube?
I always use distilled or boiled water to mix J-Lube, measure accurately, and mix slowly to avoid clumps. Work in a clean area, wash hands before and after handling, and label containers with the mix date. When in doubt about a specific use, consult product guidelines or a professional.
Closing Thoughts
I recommend J-Lube recipes that balance smooth performance, safety, and simple, eco-friendly ingredients. I find mixes using clean water and the right powder-to-water ratio give the best texture and reduce clumps. Warm water and gradual mixing help hydrate the powder evenly, and storing the mix in a sealed container keeps it stable.
I stress safety: use distilled or boiled-cooled water when purity matters, avoid using J-Lube where it could enter body cavities unless the product guidance explicitly allows it, and never introduce it into sterile body spaces. For equipment and surfaces, J-Lube cleans up with soap and water, but test small areas first to avoid staining.
I favor formulas that use few additives and biodegradable components when possible. These options perform well while lowering environmental impact and simplifying cleanup.
I encourage choosing a trusted product and following clear mixing and safety steps. Pick a reliable source, measure carefully, and store mixtures properly to get consistent results and long-term value.